If fall had a love letter, it would be written in pumpkin and sealed with chocolate. These Healthy Pumpkin Blossoms are my cozy-season cookie of choice—soft, chewy, lightly spiced, and topped with a melty dark chocolate kiss. Perfect for bake sales, after-school snacks, or, let’s be honest, sneaking one (or three) with your morning coffee.
I first whipped up a batch of these when my middle kid insisted that “pumpkin cookies NEED chocolate hats.” And you know what? He was right. They’ve been a staple in our home ever since, disappearing faster than I can hide them in the pantry.
Table of Contents
Why You’ll Love These Healthy Pumpkin Blossoms
- They’re naturally sweetened with maple syrup.
- Pumpkin purée makes them moist and chewy without loads of butter.
- You can make them gluten-free or even vegan.
- They taste like pumpkin pie and chocolate had the cutest little baby.
What Do Healthy Pumpkin Blossoms Taste Like?
Imagine the cozy spice of pumpkin bread meets the soft chewiness of your favorite cookie—all crowned with a rich dark chocolate kiss. The pumpkin brings moisture and a gentle sweetness, while the chocolate adds that irresistible melt-in-your-mouth surprise.
Ingredients You’ll Need for Healthy Pumpkin Blossoms
The beauty of Healthy Pumpkin Blossoms is that they’re made with everyday pantry staples you probably already have at home. Each ingredient plays a special role in creating that chewy cookie texture with a gooey chocolate center. Let’s break it down:
- White Whole Wheat Flour (1 cup / 120g) – This gives the cookies structure while still keeping them light. White whole wheat flour is milder in flavor than regular whole wheat, which means you’ll get the nutrition without the “heavy” taste. If you’re gluten-free, you can easily swap in a gluten-free flour blend, or try the homemade mix in the recipe notes below.
- Ground Cinnamon (1 tsp) – A must for any fall baking! Cinnamon adds warmth and depth, making the pumpkin flavor shine. For an extra autumn kick, you could also sprinkle in pumpkin spice—similar to what I use in my Pumpkin Spice Almond Muffins.
- Cornstarch (1 tsp) – This might seem unusual, but it’s the secret to soft, chewy cookies. It helps keep the pumpkin purée from making the dough too cakey.
- Baking Powder (¾ tsp) – Just enough to give the cookies a slight lift without turning them into fluffy muffins.
- Salt (¼ tsp) – A tiny amount balances the sweetness and brings out all the warm, cozy flavors.
- Unsalted Butter or Coconut Oil (1 tbsp, melted and cooled) – Butter adds richness, while coconut oil gives you a dairy-free option. Either way, it helps carry the spice and keeps the cookies tender.
- Pumpkin Purée (¾ cup / 183g) – The star of the show! Make sure you use 100% pure pumpkin purée, not pumpkin pie filling (which is already sweetened and spiced). Pumpkin adds natural sweetness, moisture, and that unmistakable autumn flavor.
- Vanilla Extract (1 tsp) – Just a touch enhances the pumpkin and chocolate flavors, tying everything together.
- Pure Maple Syrup (½ cup / 120mL) – A natural sweetener that keeps these Healthy Pumpkin Blossoms moist and flavorful. If you prefer, honey, agave, or even coconut sugar plus a splash of milk can be substituted.
- Dark Chocolate Kisses (24 pieces) – These little jewels make the cookies irresistible. If you’re making them vegan, you can swap in large chunks of dairy-free dark chocolate. You could also play around with fun flavors like pumpkin spice or caramel-filled kisses.
How to Make Healthy Pumpkin Blossoms
Making Healthy Pumpkin Blossoms is a joyful little project that doesn’t require fancy tools—just a few bowls, a spoon, and a little patience while the kitchen fills with the smell of warm pumpkin spice. Here’s how to do it:
Step 1: Prepare Your Dry Ingredients
In a medium mixing bowl, whisk together the flour, cinnamon, cornstarch, baking powder, and salt. Whisking not only combines the ingredients evenly, but also adds a little air, helping your cookies stay light and chewy.
👉 Tip: If you want extra depth of flavor, you can swap the cinnamon for pumpkin pie spice. That’s the same cozy blend I love using in my Soft and Chewy Pumpkin Cookies.
Step 2: Mix the Wet Ingredients
In a separate large bowl, whisk the melted butter (or coconut oil if you’re going dairy-free), pumpkin purée, and vanilla extract until smooth. This creates a creamy base for your dough and makes sure the pumpkin flavor is evenly distributed.
👉 Note: Always use pure pumpkin purée, not pumpkin pie filling. Pie filling already has sugar and spices, which would throw off the balance in these cookies.
Step 3: Sweeten the Dough
Slowly stir the maple syrup into the wet ingredients. This natural sweetener not only adds flavor but also keeps the cookies moist. If you prefer, you can substitute honey or agave. For a lower-sugar option, coconut sugar with a splash of milk also works beautifully.
Step 4: Combine Wet and Dry Mixtures
Add the dry flour mixture to the wet pumpkin mixture. Stir gently until just combined. Be careful not to overmix—overworked dough makes cookies tough. You want everything evenly blended but still soft and scoopable.
👉 Tip: The dough will be sticky, and that’s exactly how it should be. Don’t worry—it will firm up once it chills.
Step 5: Chill the Dough
Cover the bowl and place it in the refrigerator for at least 30 minutes. Chilling prevents the cookies from spreading too much and helps them keep that perfect blossom shape. If you’re chilling longer than an hour, cover the top of the bowl with foil or plastic wrap so it doesn’t dry out.
Step 6: Preheat the Oven
While the dough chills, preheat your oven to 325°F. Line a baking sheet with parchment paper or a silicone baking mat. This will keep the cookies from sticking and make cleanup a breeze.
Step 7: Shape the Cookies
Once chilled, scoop the dough into 24 small rounded mounds. Use a spoon or cookie scoop to keep them uniform. Place them on the prepared baking sheet, leaving a little space between each cookie.
👉 Important: These cookies don’t spread much, so gently flatten each mound so it’s just slightly wider than the base of your chocolate kiss. This way, the chocolate sits perfectly on top after baking.
Step 8: Bake the Cookies
Slide the baking sheet into the preheated oven and bake for 13–16 minutes. Keep an eye on them! The centers should look slightly underdone—that’s the secret to keeping your Healthy Pumpkin Blossoms soft and chewy.
Step 9: Add the Chocolate Kiss
As soon as the cookies come out of the oven, gently press a dark chocolate kiss into the center of each cookie. The warmth will soften the chocolate just enough to make it nestle perfectly into place.
👉 Tip: Don’t push too hard—you want the kiss to sit on top, not disappear into the cookie.
Step 10: Cool Before Serving
Allow the cookies to cool on the baking sheet for about 10 minutes before transferring them to a wire rack. This gives the cookies time to set and keeps them from breaking apart. Once cooled, they’re ready to enjoy—or to be tucked into a tin for gifting.
Tips and Tricks for Perfect Healthy Pumpkin Blossoms
- Don’t overbake. They’ll lose their chewy texture. Pull them when the centers still look a little soft.
- Chill the dough. It’s sticky—trust me, you’ll thank me later.
- Shape them round. Use a mini spatula to nudge them into picture-perfect circles.
- Flavor twist. Try pumpkin spice or caramel-filled kisses if you want to mix things up.
Storage for Healthy Pumpkin Blossoms
- Room temperature: 2–3 days in an airtight container.
- Fridge: Keeps fresh up to a week (ours rarely last that long).
- Freezer: Freeze baked cookies for up to 2 months. Thaw at room temp.
FAQs
Can I make these ahead of time?
Yes! Chill the dough up to 24 hours in advance. Just cover the bowl so it doesn’t dry out.
Can I use regular all-purpose flour?
Absolutely. White whole wheat adds fiber, but all-purpose works just fine.
What if I don’t have chocolate kisses?
Use any chocolate chunk or chip you love—it’ll still be delicious.
Conclusion
These Healthy Pumpkin Blossoms are everything you want in a fall cookie: chewy, lightly spiced, and crowned with chocolate. Whether you’re baking with the kids, prepping snacks for a busy week, or treating yourself, this recipe is one you’ll come back to again and again.
If you love pumpkin treats, you might also enjoy my Pumpkin Spice Almond Muffins or these Soft and Chewy Pumpkin Cookies.
Follow us on Pinterest for weekly slow cooker inspiration, or join the conversation over on our Facebook page where fellow food lovers share their favorite comfort meal.
Print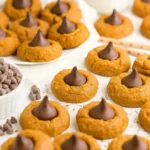
Healthy Pumpkin Blossoms – The Best Fall Cookie Recipe
- Prep Time: 15 minutes
- Cook Time: 16 minutes
- Total Time: 31 minutes
- Yield: 24 small cookies
- Category: Dessert
- Method: Baking
- Cuisine: American
- Diet: Vegetarian
Description
These cookies are perfect for anyone who loves pumpkin and chocolate! The pumpkin cookies are deliciously chewy with the perfect hint of spice, and the dark chocolate kiss in the center makes them taste even more irresistible. Leftovers will keep for at least one week if stored in an airtight container in the refrigerator—if they last that long!
Ingredients
1 cup (120g) white whole wheat flour or gluten-free* flour (measured like this)
1 tsp ground cinnamon
1 tsp cornstarch
3/4 tsp baking powder
1/4 tsp salt
1 tbsp (14g) unsalted butter or coconut oil, melted and cooled slightly
3/4 cup (183g) pumpkin purée (NOT pumpkin pie filling)
1 tsp vanilla extract
1/2 cup (120mL) pure maple syrup
24 dark chocolate kisses
Instructions
1. In a medium bowl, whisk together the flour, cinnamon, cornstarch, baking powder, and salt.
2. In a separate bowl, whisk together the butter, pumpkin, and vanilla. Stir in the maple syrup.
3. Add the flour mixture to the wet ingredients, stirring just until incorporated. Chill the cookie dough for at least 30 minutes. (If chilling longer than 1 hour, cover the top of the bowl with foil.)
4. Preheat the oven to 325°F, and line a baking sheet with a silicone baking mat or parchment paper.
5. Drop the cookie dough into 24 rounded scoops onto the prepared baking sheet. Flatten the cookie dough mounds to be just slightly wider than the chocolate kisses.
6. Bake at 325°F for 13-16 minutes. (The centers should still feel slightly underdone!)
7. Once the cookies come out of the oven, immediately (but gently!) press a chocolate kiss into the center of each cookie.
8. Cool on the baking sheet for at least 10 minutes before carefully transferring to a wire rack to cool completely.
Notes
Do NOT overbake these cookies! They’ll turn out cakey instead of chewy if baked for too long.
The dough is sticky—use a spoon and spatula to scoop.
Flatten dough slightly so cookies are just wider than the base of a chocolate kiss.
To make perfectly round cookies, use a mini spatula to gently shape them before baking.
Whole wheat pastry flour, all-purpose flour, or regular whole wheat flour can be used instead of white whole wheat.
For gluten-free, use 1/4 cup millet flour, 1/4 cup tapioca flour, 3 tbsp coconut flour, and 3/4 tsp xanthan gum.
Maple syrup can be swapped with honey, agave, or 1/2 cup coconut/brown sugar plus 1/4 cup milk.
For vegan, use chopped dark chocolate pieces instead of chocolate kisses.
Try caramel-filled or pumpkin spice kisses for a fun twist!