There’s just something magical about Crispy Garlic Butter Chicken. That golden, crunchy coating paired with garlicky, buttery goodness? Oh, friend—it’s the kind of dinner that makes the whole family race to the table before you even call them. And the best part? You don’t have to stand over a frying pan or deal with grease splatters. This beauty comes together in the air fryer in about 20 minutes flat.
As a busy Texas mom of three, I can promise you this: if a recipe doesn’t work on a hectic Tuesday night when backpacks are flying and somebody’s asking where their socks went, it doesn’t make the cut. But this one? It’s a keeper.
Table of Contents
Why You’ll Love This Crispy Garlic Butter Chicken
- Quick and easy: From prep to plate in about 30 minutes.
- Healthier than fried: Air-fried crispiness without all the oil.
- Kid-approved: Even picky eaters will devour it.
- Versatile: Serve it with mashed potatoes, over pasta, or alongside a crisp salad.
What Does Crispy Garlic Butter Chicken Taste Like?
Imagine the crunch of perfectly seasoned breadcrumbs hugging tender chicken, finished with rich, fragrant garlic butter that seeps into every bite. It’s crispy on the outside, juicy on the inside, and bursting with flavor. In my house, it’s often described as “better than restaurant chicken tenders”—and honestly, I can’t argue.
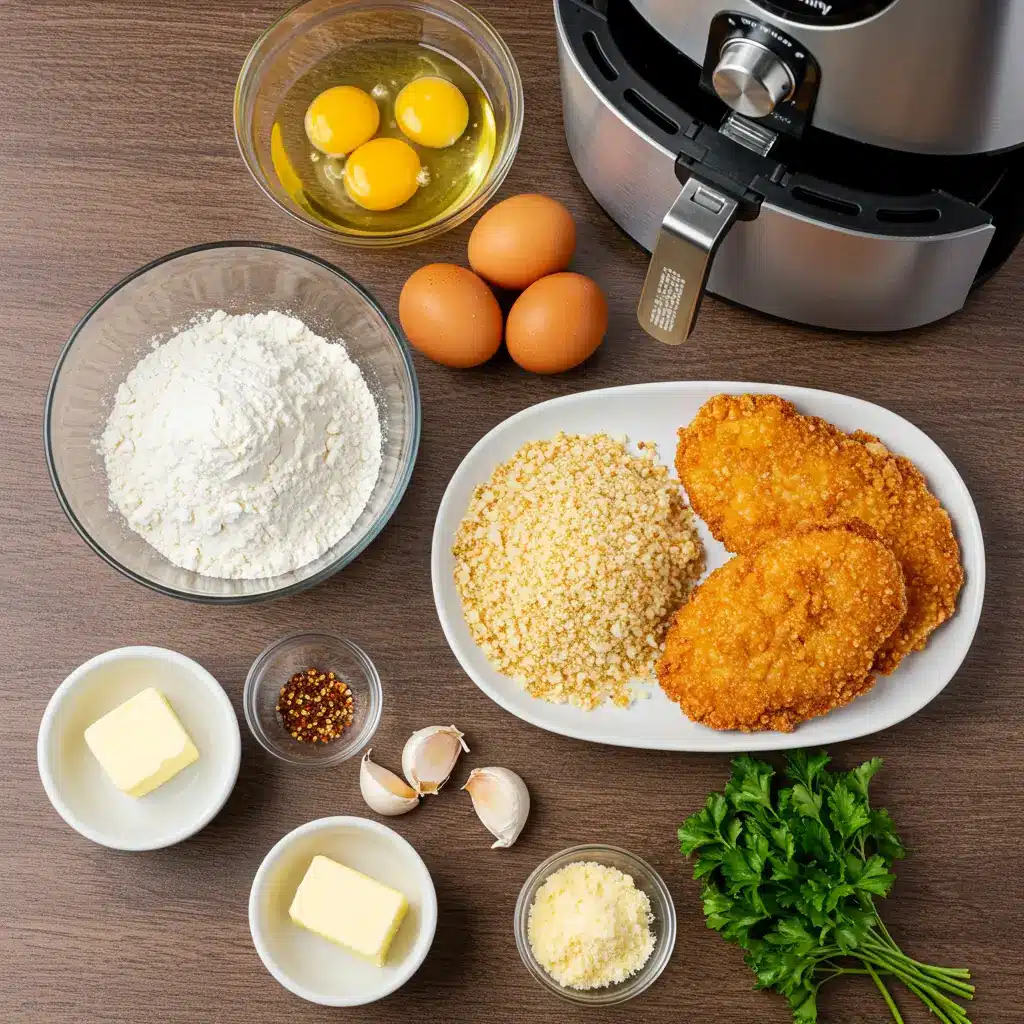
Ingredients You’ll Need for Crispy Garlic Butter Chicken
When it comes to making Crispy Garlic Butter Chicken, the secret really lies in using simple, everyday ingredients that work together to create layers of flavor and texture. The good news? You probably already have most of these sitting in your pantry or fridge. Here’s a closer look:
For the Chicken:
- Chicken breasts – You’ll need 2 large boneless, skinless chicken breasts (about 2 pounds total). Slice them in half horizontally to make 4 thinner fillets. This helps them cook evenly and keeps them extra tender. If you’ve tried my Homemade Chicken Noodle Soup, you’ll know I love using chicken breast for that lean, juicy bite.
- Salt and pepper – A simple seasoning, but don’t underestimate it. It sets the foundation for all the other flavors to shine.
- Flour – About ½ cup, used for dredging. This light coating helps the egg wash stick and creates a base layer for the crispy crust.
- Eggs – 2 large eggs, whisked. The eggs act as “glue,” binding the breadcrumbs and Parmesan to the chicken.
- Breadcrumbs – A combination of ½ cup panko (for crunch) and ½ cup Italian breadcrumbs (for flavor). The duo gives you the best of both worlds—texture and taste.
- Parmesan cheese – ½ cup grated Parmesan mixed with the breadcrumbs. This adds a nutty, salty kick and helps the crust turn that irresistible golden-brown.
- Oil spray – Avocado or olive oil spray is essential for air frying. It mimics deep-frying without the heavy grease, giving the chicken that crave-worthy crisp.
For the Garlic Butter:
- Unsalted butter – ¼ cup melted in a skillet until it’s rich and golden. This is where the flavor magic begins.
- Garlic – Six fresh cloves, minced finely. Garlic is the star of the show, bringing warmth and depth to every bite.
- Fresh parsley – Finely chopped and sprinkled over the top for a pop of freshness and color.
💡 Pro tip: A squeeze of fresh lemon juice over your Crispy Garlic Butter Chicken right before serving adds a bright, tangy contrast to the rich garlic butter.
How to Make Crispy Garlic Butter Chicken
Making Crispy Garlic Butter Chicken at home is easier than you think, especially when you let the air fryer do the heavy lifting. Let’s walk through it step by step so your chicken comes out golden, juicy, and downright irresistible.
Step 1: Prep the Chicken
Start by placing your 2 large chicken breasts on a cutting board. Carefully slice them in half horizontally to create 4 fillets. This ensures they cook quickly and evenly (plus, thinner pieces mean more crispy surface area—yum!).
Next, cover the fillets with plastic wrap and give them a gentle pound with a rolling pin or meat mallet. You’re not trying to flatten them completely—just even them out so they all cook at the same pace. Sprinkle both sides generously with salt and pepper.
Step 2: Set Up the Breading Station
Grab three shallow bowls. In the first, place ½ cup of flour. In the second, beat 2 large eggs until smooth. In the third, mix together ½ cup panko breadcrumbs, ½ cup Italian breadcrumbs, and ½ cup grated Parmesan cheese.
This three-step process is the key to that crispy, golden crust. The flour helps the egg stick, the egg binds everything together, and the breadcrumb + Parmesan mix gives you that signature crunch with a cheesy edge.
Step 3: Coat the Chicken
Working one piece at a time, dredge each chicken fillet in flour, shaking off the excess. Then dip it into the egg wash, coating it fully. Finally, press it firmly into the breadcrumb mixture so every nook and cranny is covered.
Pro tip: Use your fingers to gently press the breadcrumbs onto the chicken. This helps them adhere better so they won’t fall off while cooking.
Step 4: Air Fry the Chicken
Preheat your air fryer to 390°F (200°C). Lightly spray the basket with avocado or olive oil spray. Place two fillets in the basket (don’t overcrowd!) and spray the tops of the chicken with more oil.
Air fry for 10–12 minutes, flipping halfway through. After about 6 minutes, open the basket, flip the fillets, spray again, and finish cooking until the outside is golden and the inside reaches 165°F. Repeat with the remaining fillets.
If you’ve ever made my Garlic Parmesan Crockpot Chicken and Potatoes, you know how much I love layering garlic and Parmesan—it’s the same flavor magic happening here, just in crispy form!
Step 5: Make the Garlic Butter
While the chicken finishes, heat ¼ cup unsalted butter in a skillet over medium heat. Add 6 minced garlic cloves and let them sizzle for about 30 seconds until fragrant (be careful not to burn them—burnt garlic turns bitter).
Add the crispy chicken fillets to the pan, spoon the garlic butter over them, and let each side bathe in the buttery goodness for about a minute.
Step 6: Garnish and Serve
Transfer the Crispy Garlic Butter Chicken to a serving platter, sprinkle with chopped parsley, and add a squeeze of fresh lemon juice if you like a little brightness.
Serve hot with mashed potatoes, over a bed of pasta, or alongside a fresh salad for balance. Trust me, once you make this, it’s going to earn a permanent spot in your weeknight rotation.
Tips and Tricks for Perfect Crispy Garlic Butter Chicken
- Don’t skip the spray: A light mist of oil makes all the difference in achieving that golden crunch.
- Cook in batches: Overcrowding the basket means soggy chicken—give them space!
- Make it your own: Add a pinch of chili flakes for spice or swap Parmesan with Asiago for a nutty twist.
- Storage hack: Reheat in the air fryer at 375°F for 4–6 minutes to bring back the crisp.
Storage for Crispy Garlic Butter Chicken
- Fridge: Store cooled chicken in an airtight container for up to 3 days.
- Reheat: Air fry leftovers until crispy again (never microwave—trust me, you’ll regret it).
FAQs
Can I make this without an air fryer?
Yes! Bake at 425°F for about 20 minutes, flipping halfway.
Can I freeze it?
Absolutely. Bread the chicken but don’t cook it. Freeze on a tray, then transfer to a bag. Air fry straight from frozen at 400°F for 14–16 minutes.
Can I use chicken thighs instead?
Sure! Just adjust cook time since thighs are thicker and juicier.
Conclusion
This Crispy Garlic Butter Chicken is everything a weeknight dinner should be—quick, easy, flavorful, and a little indulgent. It’s a recipe that saves me on busy evenings and makes everyone at the table happy (yes, even the sock-losing crew). Give it a try, and don’t be surprised if it becomes a regular star in your weekly meal lineup.
And if you’re in a cozy mood, try pairing it with my Homemade Chicken Noodle Soup for the ultimate comfort meal.
Follow us on Pinterest for weekly slow cooker inspiration, or join the conversation over on our Facebook page where fellow food lovers share their favorite comfort meal.
Print
Crispy Garlic Butter Chicken – Quick, Easy & Delicious
- Prep Time: 10 minutes
- Cook Time: 20 minutes
- Total Time: 30 minutes
- Yield: 4 servings
- Category: Main Course
- Method: Air Fryer
- Cuisine: American
Description
These Crispy Garlic Butter Chicken Cutlets are air-fried to golden perfection and finished with rich garlic butter. A quick and flavorful weeknight dinner that feels indulgent but is easy to make.
Ingredients
- 2 large boneless, skinless chicken breasts, cut in half horizontally (2 pounds)
- Salt and pepper, to taste
- 1/2 cup flour
- 2 large eggs
- 1/2 cup panko breadcrumbs
- 1/2 cup Italian breadcrumbs
- 1/2 cup grated Parmesan cheese
- Avocado or olive oil spray
- 1/4 cup unsalted butter
- 6 garlic cloves, minced
- Fresh parsley, finely chopped (for garnish)
Instructions
1. Place chicken fillets on a cutting board, cover with plastic wrap, and pound evenly. Season both sides with salt and pepper.
2. Place flour in a shallow bowl, beaten eggs in a second bowl, and a mixture of panko, Italian breadcrumbs, and Parmesan in a third bowl.
3. Dredge each chicken fillet in flour, then egg, then the breadcrumb mixture, pressing the crumbs onto the chicken.
4. Place chicken fillets in air fryer basket and spray with oil.
5. Air fry at 390°F (200°C) for 10–12 minutes, flipping at the 6-minute mark and spraying with oil again.
6. Cook in batches if needed to avoid overcrowding.
7. In a pan, melt unsalted butter over medium heat. Add minced garlic and sauté for about 30 seconds until fragrant.
8. Add the cooked chicken cutlets and sauté in garlic butter for 1 minute per side.
9. Sprinkle with fresh parsley, squeeze lemon juice over the top if desired, and serve.
Notes
Store cooled chicken in an airtight container in the fridge for up to 3 days.
To reheat, air fry at 375°F (190°C) for 4–6 minutes until warmed through and crispy.
Serve with a side salad, roasted veggies, or mashed potatoes for a full meal.