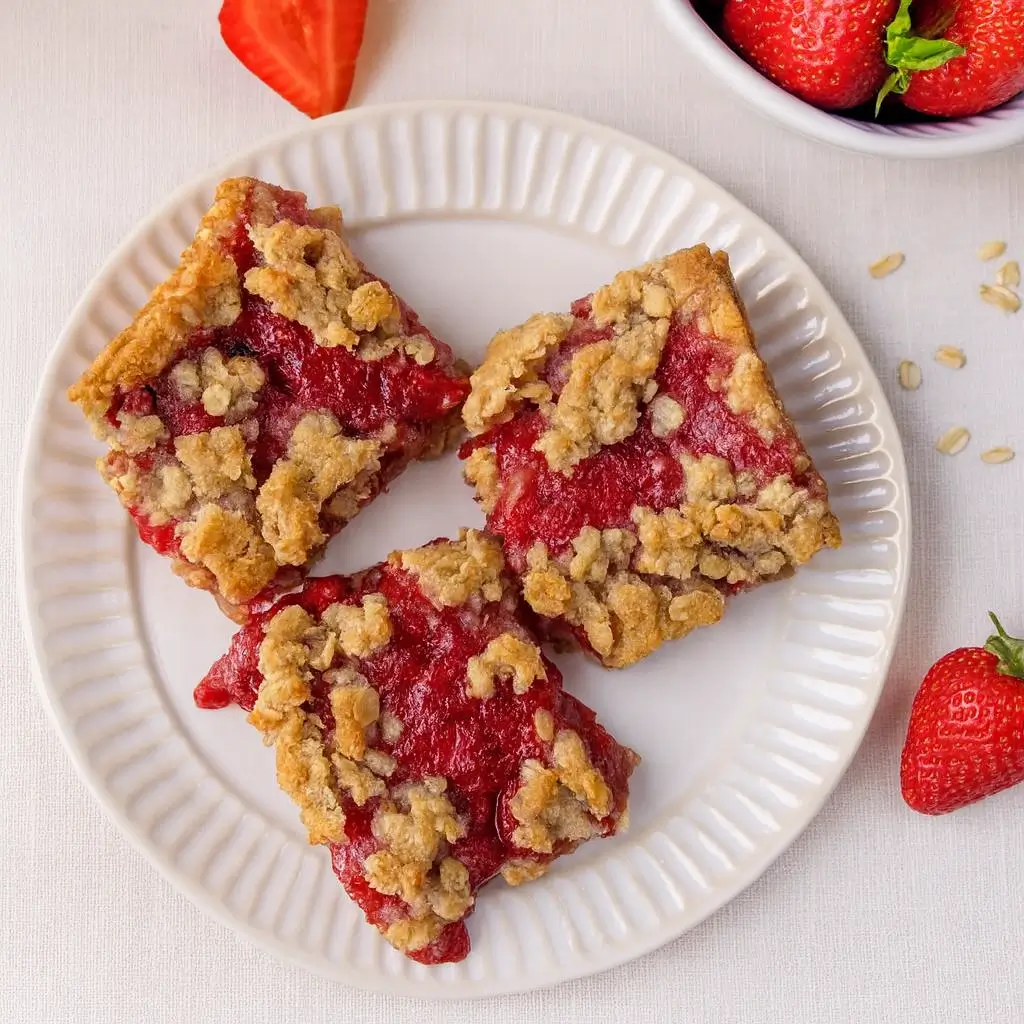
Healthy Oatmeal Strawberry Bars are the kind of treat that makes you feel like you’re having dessert for breakfast—but without the sugar crash or the guilt trip. They’re chewy, crumbly, and packed with that sun-kissed strawberry flavor we all crave when we’re trying to eat something “healthy” but still delicious. Perfect for busy mornings, after-school snacks, or that late-night “I just need a little something sweet” moment.
What I love about these bars is how simple they are to make—no fancy ingredients or complicated techniques. They’re vegan, gluten-free, dairy-free, and naturally sweetened with maple syrup. It’s a snack you’ll feel good about feeding your family (or, let’s be honest, keeping all to yourself).
Table of Contents
What is Healthy Oatmeal Strawberry Bars?
Healthy Oatmeal Strawberry Bars are a cross between a soft-baked cookie and a fruit crumble, layered with sweet-tart strawberries and an irresistibly golden oat topping. Think of them as nature’s Pop-Tart, but way better for you. The base and topping are made with rolled oats and almond flour, giving the bars a hearty, nutty texture, while the strawberry filling is naturally thickened with tapioca starch and kissed with lemon zest for brightness.
They bake into chewy, crumbly squares that hold their shape perfectly once cooled. These bars are great for breakfast, snacks, or even dessert paired with a little coconut yogurt or vanilla ice cream. They also pack beautifully in lunch boxes or meal prep containers, so you can have something wholesome and satisfying all week long.
Reasons to Try Healthy Oatmeal Strawberry Bars
If you’ve ever stood in front of your pantry looking for a “healthy snack” that doesn’t taste like birdseed, this one’s for you. These Healthy Oatmeal Strawberry Bars hit that sweet spot between nutritious and indulgent. They’re naturally sweetened with maple syrup, packed with fiber from the oats, and bursting with fresh strawberry flavor.
You won’t find any refined sugar or butter here—just whole, real ingredients that actually make you feel good after eating them. Plus, they’re incredibly versatile. You can swap in blueberries, raspberries, or even peaches depending on what’s in season. They freeze beautifully and taste just as amazing warmed up in the toaster oven a few days later. Basically, if you’re craving something that feels homemade, comforting, and a little nostalgic—these bars are it.
Ingredients Needed to Make Healthy Oatmeal Strawberry Bars
Strawberry Layer:
- 3 cups fresh strawberries, diced (frozen works too—just thaw and drain first)
- ¼ cup maple syrup
- 1 tablespoon lemon juice
- 1–2 tablespoons lemon zest
- Pinch of sea salt
- 2 tablespoons tapioca starch
Oatmeal Layers:
- 1½ cups rolled oats (use gluten-free if needed)
- 1½ cups almond flour
- ½ teaspoon baking soda
- ⅛ teaspoon sea salt
- ½ cup maple syrup
- ⅓ cup coconut oil (solid at room temperature)
- 1 teaspoon lemon juice

Instructions to Make Healthy Oatmeal Strawberry Bars – Step by Step
If you’re ready to whip up these Healthy Oatmeal Strawberry Bars, grab your apron and let’s walk through everything together — step by step. Don’t worry, it’s easier than it looks, and by the end, your kitchen will smell like a cozy bakery on a spring morning.
Step 1: Make the Sweet Strawberry Filling
We’re kicking things off with the heart of the recipe — that juicy strawberry layer. In a small saucepan, toss in your diced strawberries, maple syrup, lemon juice, zest, and a pinch of sea salt. Turn the heat to medium and stir occasionally as the strawberries begin to release their natural juices. This part takes about 5–10 minutes, and it’s where all the magic happens. The berries soften, the syrup thickens, and your kitchen fills with that nostalgic scent of homemade jam.
Once the mixture looks glossy and slightly thickened, sprinkle in your tapioca starch and stir for one more minute. This helps the filling set up nicely later, so your bars aren’t soggy in the middle. Remove it from the heat and let it cool while you prepare the oatmeal base. If you’re new to thickening fruit fillings, check out my post on ingredient substitutions and thickening hacks for tips on what to use if you’re out of tapioca starch (hint: arrowroot powder or cornstarch work too).
Step 2: Prep the Baking Dish Like a Pro
Next up, let’s talk prep work — the unsung hero of every baking recipe. Preheat your oven to 375°F and line an 8×8-inch baking dish with parchment paper. Leave enough overhang on the sides so you can lift the bars out easily later (your future self will thank you). This step ensures a clean release, meaning no crumbling or scraping bits off the corners of your pan. If you want to learn more about how to line a baking pan perfectly, you’ll find a quick how-to in my Crockpot Healthy White Chicken Chili post — I use the same trick for all my casseroles and bars!
Step 3: Combine the Dry Ingredients
Now it’s time to build that crumbly, golden oatmeal base. In a large mixing bowl, combine the rolled oats, almond flour, baking soda, and sea salt. Give it a quick stir so everything is evenly mixed. This combo is what gives your bars structure and that irresistible chewy texture.
If you’re using gluten-free oats, make sure they’re certified gluten-free to keep the recipe safe for everyone at the table. You can also swap almond flour for oat flour if you have nut allergies — I’ve shared this variation in my Cookie Dough Protein Balls, and it works beautifully here too.
Step 4: Add the Wet Ingredients and Mix Well
Once your dry ingredients are blended, drizzle in the maple syrup, spoon in your solid coconut oil, and add a splash of lemon juice. These three are the secret trio that brings everything together. Use your hands or the back of a spoon to mix until the texture becomes crumbly but cohesive — kind of like damp sand that holds its shape when pressed.
If the mixture feels too dry, add a tiny drizzle of maple syrup. If it’s too sticky, sprinkle in a tablespoon of oats. Don’t overthink it — this recipe is wonderfully forgiving. Just keep going step by step, and it’ll come together perfectly.
Step 5: Build the Base Layer
Now we’re getting to the fun part — assembly! Scoop out about ½ to ¾ cup of your oat mixture and set it aside for later (this will be your topping). Take the rest and press it firmly into the bottom of your parchment-lined baking dish. Use your fingers or the back of a measuring cup to flatten it evenly into all corners. This will form a sturdy, buttery base that holds the bars together.
A little pro tip: slightly dampen your hands before pressing to keep the mixture from sticking to your fingers. It’s a small trick I also use in recipes like my Brownie Protein Balls, and it works every time.
Step 6: Add the Strawberry Filling
Once your base is set, spoon that cooled strawberry mixture over the top. Spread it evenly using a spatula or the back of a spoon. Don’t rush this step — take a moment to admire the gorgeous ruby-red filling. It’s packed with vitamin C and natural sweetness, so you can feel good about indulging.
If you prefer a thicker fruit layer, you can double the strawberry portion. Or, for a twist, try swapping half the strawberries for raspberries or blueberries — kind of like a mixed berry crumble bar!
Step 7: Crumble and Top It Off
Time to bring out that reserved oatmeal mixture you set aside earlier. Sprinkle it evenly over the strawberry filling like a rustic crumble topping. Some larger chunks, some smaller — that variety gives the bars their signature homemade look.
If you love texture, you can add a few sliced almonds or shredded coconut on top before baking. It adds a little crunch and makes the bars look bakery-level fancy.
Step 8: Bake to Golden Perfection
Place your dish in the preheated oven and bake for 20–25 minutes. Keep an eye out around the 20-minute mark — once the edges turn golden brown and the top looks toasty, they’re ready. Every oven runs differently, so don’t be afraid to check early.
While they bake, your home will smell incredible — think cozy Sunday morning vibes mixed with summer sweetness. If you love that warm, freshly baked scent, you’ll probably enjoy my Greek Yogurt Banana Muffins too — they have that same comforting aroma.
Step 9: Cool Completely Before Cutting
This is the hardest step — waiting. But it’s worth it! Let your bars cool completely in the pan before lifting them out. The cooling process allows the filling to set and the crust to firm up, making slicing so much easier. If you cut too early, they’ll crumble (still delicious, but messier).
Once cooled, lift them out using the parchment paper and cut into squares or rectangles. You’ll get about nine hearty servings.
Step 10: Serve, Share, and Enjoy
Now comes the best part — enjoying your creation! These Healthy Oatmeal Strawberry Bars are perfect on their own, but if you’re feeling extra, try drizzling almond butter on top or serving with a scoop of coconut yogurt for breakfast. They also pair beautifully with a cup of coffee or tea.
If you’re prepping snacks for the week, wrap each bar individually and store them in the fridge. They’ll last up to a week (if they make it that long). For more easy snack ideas, check out my Best No-Bake Protein Balls — another reader favorite that’s quick, healthy, and totally satisfying.
And there you have it — the complete, step by step guide to making Healthy Oatmeal Strawberry Bars that taste as good as they look. Simple ingredients, wholesome flavor, and a recipe you’ll want to make again and again.
What to Serve with Healthy Oatmeal Strawberry Bars
These bars are so versatile that you can serve them with pretty much anything. In the morning, pair them with a smoothie or a cup of coffee for a quick grab-and-go breakfast. In the afternoon, they’re perfect alongside a cup of tea or as part of a healthy snack spread with nuts and fruit. For dessert, try them warm with Greek yogurt or coconut ice cream. If you love recipes that double as snacks and desserts, check out our Energy Balls for another quick, wholesome treat.
Key Tips for Making Healthy Oatmeal Strawberry Bars
- Cool completely before slicing. This is key! The bars need to firm up as they cool.
- Use parchment paper. Makes cleanup easy and prevents sticking.
- Taste your strawberries. If they’re extra tart, you can add a touch more maple syrup.
- Don’t overbake. Once the top turns golden, they’re done. Overbaking can make them dry.
- Customize! Try different fruits like blueberries or raspberries for fun seasonal twists.
Storage and Reheating Tips for Healthy Oatmeal Strawberry Bars
Let the bars cool completely before storing. You can keep them in an airtight container at room temperature for up to 2 days or in the fridge for up to a week. For longer storage, freeze them for up to 3 months—just separate layers with parchment paper. When ready to enjoy, reheat in the toaster oven or microwave for a few seconds to bring back that just-baked warmth.
FAQs
Can I use frozen strawberries? Yes! Just thaw them completely and drain off the extra liquid before cooking.
Can I make these nut-free? Absolutely. Substitute oat flour for almond flour for a nut-free version.
Can I use honey instead of maple syrup? You can, but the bars will have a slightly different flavor.
Do these bars hold up for meal prep? Definitely—they’re perfect for make-ahead breakfasts or healthy snacks.
Final Thoughts
Healthy Oatmeal Strawberry Bars are one of those recipes that checks every box: easy, wholesome, and seriously delicious. They’re perfect for busy mornings, lunchbox snacks, or a simple dessert you can actually feel good about. Once you make them, they’ll become a regular in your kitchen rotation—especially when strawberries are in season. If you enjoy feel-good, nourishing recipes like this, you’ll love my Crockpot Healthy White Chicken Chili or Cookie Dough Protein Balls next.
Follow us on Pinterest for weekly slow cooker inspiration, or join the conversation over on our Facebook page where fellow food lovers share their favorite comfort meal.
Print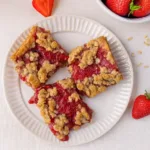
Healthy Oatmeal Strawberry Bars – Easy, Vegan & Delicious
- Prep Time: 20 minutes
- Cook Time: 35 minutes
- Total Time: 55 minutes
- Yield: 9 servings
- Category: Breakfast, Dessert, Snack
- Method: Baking
- Cuisine: American
Description
These healthy oatmeal strawberry bars are perfectly crumbly and sweet with a simple homemade strawberry filling. Great for breakfast, snacks, or a wholesome dessert. Vegan, gluten-free, dairy-free, and refined sugar-free.
Ingredients
Strawberry Layer:
- 3 cups fresh strawberries, diced (you can use frozen but let them defrost completely and dump off liquid)
- 1/4 cup maple syrup
- 1 Tablespoon lemon juice
- 1–2 Tablespoons lemon zest
- a pinch of sea salt
- 2 Tablespoons tapioca starch
Oatmeal Layers:
- 1 1/2 cups rolled oats (gluten-free if needed)
- 1 1/2 cups almond flour
- 1/2 teaspoon baking soda
- 1/8 teaspoon sea salt
- 1/2 cup maple syrup
- 1/3 cup coconut oil, solid at room temperature
- 1 teaspoon lemon juice
Instructions
1. To a small pot on medium heat, add diced strawberries, maple syrup, lemon juice, lemon zest and sea salt. Allow this to simmer for 5–10 minutes or until strawberries have released a lot of the liquid.
2. Stir in tapioca starch and let it simmer for 1 more minute. Remove from heat and set aside while you make the oatmeal layer.
3. Preheat your oven to 375°F and line an 8×8 baking dish with parchment paper.
4. In a large mixing bowl, combine rolled oats, almond flour, baking soda and sea salt. Once combined, add in maple syrup, coconut oil, lemon juice and mix until a dough forms.
5. Set aside 1/2 cup to 3/4 cup of the oatmeal mixture and press the remaining mixture into your lined baking dish in an even layer.
6. Add the strawberry filling on top and spread into an even layer.
7. Sprinkle the remaining oatmeal mixture across the top of the strawberry layer.
8. Bake for 20–25 minutes or until the edges are lightly golden.
9. Allow bars to cool completely before slicing and serving.
Notes
Store bars in an airtight container at room temperature for up to 2 days, or refrigerate for up to 5 days.
These bars also freeze well—wrap individually and freeze for up to 2 months.