Green Cookies are everything you didn’t know you were missing in your dessert game. Bright, fun, and loaded with melty chocolate chips and crunchy crushed Oreos, these soft cookies are like a party in every bite. And yes, they’re actually green—perfect for St. Patrick’s Day, Christmas cookie platters, or whenever you’re in the mood for something playful and sweet. They’re simple to make (no fancy tools required), and the dough comes together in one bowl.
The best part? You don’t have to chill the dough for hours. If you’re juggling laundry, a meeting, or feeding a small army of snack-hungry kids, these cookies fit into real life. I love how the green food coloring adds such a cheerful pop of color—plus, it’s a sneaky way to get the kids excited about baking (they go bananas for green anything). These Green Cookies check all the boxes: easy, tasty, and just the right amount of fun. Ready to make them?
Table of Contents
What is Green Cookies?
Green Cookies are basically your favorite chocolate chip cookie, but with a colorful twist and some bonus textures. They’re soft, slightly chewy, and have a fun green hue thanks to a touch of food coloring. What really sets them apart is the mix of two types of chocolate chips—semi-sweet and white—plus crushed Oreos folded right into the dough.
The result? A rich, gooey, chocolatey delight with a subtle crunch. They’re a fun spin on classic cookies that don’t take themselves too seriously. Whether you’re baking them for a themed party, packing lunchbox treats, or just whipping up something sweet for movie night, Green Cookies totally hit the mark. I first made a batch on a whim before St. Patrick’s Day, and now they’re a year-round favorite in our house. You can easily tweak the mix-ins to suit your taste, but the combo of white and dark chocolate with Oreos? Pure magic.
Reasons to Try Green Cookies
There are so many reasons these Green Cookies deserve a spot in your baking rotation. First off, they’re incredibly easy to make. No complicated steps, no waiting hours for dough to chill (though you can if you want slightly puffier cookies), and no fancy ingredients—just the basics with a fun twist. Second, they’re totally customizable. Not into white chocolate? Swap it for dark. Want to go even more over-the-top? Stir in some mint chips or festive sprinkles. Third, the vibrant green color makes these cookies a real conversation starter.
Whether you’re baking for a holiday, a birthday party, or a “just because” treat, these cookies bring a little fun to your kitchen. Plus, they’re kid-approved and picky-eater friendly—my youngest called them “monster cookies,” and now that name has kind of stuck. Bonus? They freeze beautifully, so you can bake a double batch and stash some away for snack emergencies.
Ingredients Needed to Make Green Cookies
To make these easy Green Cookies, you’ll need the following:
- 1 cup light brown sugar (packed)
- ½ cup granulated sugar
- 1 cup salted butter (softened)
- 2 large eggs
- 1 teaspoon vanilla extract
- ½ teaspoon green food coloring (gel or liquid)
- ½ teaspoon baking powder
- 1 teaspoon baking soda
- 3 cups all-purpose flour
- 1 cup semi-sweet chocolate chips
- 1 cup white chocolate chips
- 1 cup crushed Oreo cookies
Basic pantry ingredients, right? The green food coloring is optional for color but highly recommended for that playful wow factor. You can use liquid or gel—gel tends to give a richer color.
Instructions to Make Green Cookies – Step by Step
Step 1: Preheat and Prep
Let’s start with the essentials—preheat your oven to 375°F. This gives your oven time to warm up while you’re mixing the dough. Line your cookie sheets with parchment paper or use a silicone baking mat to prevent sticking. Trust me, no one wants to be scraping cookies off the pan when they could be devouring them.
Step 2: Cream Together the Butter and Sugars
In a large mixing bowl, cream together the softened salted butter, packed light brown sugar, and granulated sugar. You can use a hand mixer, stand mixer, or even a sturdy wooden spoon if that’s what you’ve got. Beat it until the mixture is fluffy and fully blended—this is what gives the cookies their soft and tender bite. It should look like a soft tan paste and smell ridiculously buttery (yum).
Step 3: Add Eggs, Vanilla, and Food Coloring
Crack in the eggs one at a time, mixing well after each one. Then, pour in the vanilla extract and your green food coloring. Go easy at first—start with ½ teaspoon and stir. You can always add more for a bolder green, especially if you’re aiming for festive vibes. If you’re using gel food coloring, a small dab goes a long way. Stir until the color is evenly blended and the batter looks like a big bowl of green goodness.
Step 4: Stir in Dry Ingredients
Now it’s time to bring in the dry team. Sprinkle in your flour, baking soda, and baking powder. Gently mix just until everything is incorporated. The dough should be thick but pliable, kind of like Play-Doh. Be careful not to overmix here—overworking the flour can lead to tough cookies, and no one wants that.
Step 5: Fold in the Fun Stuff
This is where things get fun. Gently fold in the semi-sweet chocolate chips, white chocolate chips, and crushed Oreo cookies. Don’t be shy—make sure those goodies are evenly distributed so you get a little of everything in each bite. You can use your spatula or even your clean hands for this part if the dough’s getting thick. Tip: crushing Oreos by hand gives you a nice mix of chunks and fine crumbs, which adds awesome texture.
Step 6: Scoop and Shape the Cookies
Using a cookie scoop (or two tablespoons), portion the dough into balls and place them on your prepared baking sheet. Give them some breathing room—about 2 inches apart—because they’ll spread a little while baking. If your kitchen’s warm or your dough feels a bit soft, you can pop the tray into the fridge for 15–20 minutes before baking to help prevent spreading.
Step 7: Bake to Perfection
Bake your cookies for 8 minutes. Yes, just 8! They’ll look slightly underbaked in the center, and that’s exactly what you want. The residual heat from the baking sheet will keep cooking them even after you take them out of the oven. They should have golden edges and soft green centers. If you like your cookies a little crispier, you can add an extra 1–2 minutes, but keep a close eye on them.
Step 8: Cool and Serve
Let the cookies cool on the baking sheet for about 5 minutes before transferring them to a wire rack (or let’s be real—straight onto a plate if you’re impatient like me). Cooling helps them firm up a bit and makes them easier to handle. Serve warm with a glass of milk, or pile them into an airtight container for later snacking.
If you’re into Oreo and mint combos, these Triple Layer Fudgy Mint Oreo Brownies might be right up your alley too!
What to Serve with Green Cookies
Green Cookies shine on their own, but if you’re looking to make it a full dessert spread, pair them with some Strawberry Shortcake Poke Cake for a colorful treat table. They also go great with a scoop of vanilla or mint chocolate chip ice cream if you’re feeling extra. For something lighter, serve them alongside a Strawberry Banana Smoothie Bowl for a playful contrast. These cookies are great for lunchboxes, potlucks, or movie nights—and they make adorable edible gifts too.
Key Tips for Making Green Cookies
Here’s where the magic really happens—those little baking secrets that make a big difference. First, use softened (not melted!) butter. Room temp butter helps the dough hold its shape and gives you those perfect, slightly thick cookies. If your cookies are spreading too much, try chilling the dough for 20 minutes before baking. Next, don’t skip the green food coloring—it’s the whole mood! Gel food coloring gives a more vibrant color that doesn’t fade in the oven. Also, keep an eye on your bake time. Pull the cookies when they’re still soft in the middle—overbaking will turn them dry. Lastly, fold in your mix-ins gently at the end so they don’t break up too much. That’s how you keep the Oreos chunky and the chips evenly spread.
Storage and Reheating Tips Green Cookies
Once cooled, you can store your Green Cookies in an airtight container at room temperature for up to 5 days. They’ll stay soft and chewy the whole time—if they last that long. For longer storage, pop them in the freezer for up to 3 months. Just make sure to separate layers with parchment paper or store them flat in a resealable bag. To reheat, a quick 20–30 seconds in the microwave makes them taste like they just came out of the oven—perfect for a cozy night in. If you prefer to bake them fresh every time, scoop and freeze the dough balls raw, then bake straight from the freezer with an extra minute or two in the oven.
FAQs
Can I make these without food coloring?
Absolutely. You’ll miss out on the green color, but the cookies will still taste amazing.
What if I don’t have white chocolate chips?
No problem—just use all semi-sweet chips, or toss in dark chocolate, mint chips, or even butterscotch.
Can I make these gluten-free?
Yes! Just use a good all-purpose gluten-free flour blend. Make sure your Oreos are gluten-free too.
Do I need to chill the dough?
It’s optional. If you want thicker cookies or your dough seems soft, chilling helps. Otherwise, bake away.
How do I crush Oreos without a mess?
Put them in a zip-top bag and gently smash with a rolling pin or your hand. Don’t pulverize them—chunky is good here.
Final Thoughts
Green Cookies are the sweet little surprise you didn’t know you needed. They’re fun, flavorful, and just quirky enough to feel special without being complicated. With their chewy texture, melty chips, and Oreo crunch, these cookies are bound to be a hit with both kids and adults. Whether you’re celebrating a holiday, baking for a birthday, or simply craving something sweet, this recipe delivers every time. And if you’re looking for more fun dessert ideas, you’ll love browsing recipes like our Chocolate Mint Oreo Cookies or Strawberry Cream Cheese Pastries. So go ahead—preheat that oven, grab your green food coloring, and let’s get baking. Green Cookies are calling!
Follow us on Pinterest for weekly slow cooker inspiration, or join the conversation over on our Facebook page where fellow food lovers share their favorite comfort meal.
Print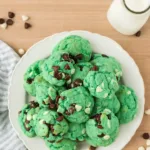
The Best Green Cookies Recipe (with Step by Step Guide)
- Prep Time: 10 minutes
- Cook Time: 24 minutes
- Total Time: 34 minutes
- Yield: 24 cookies
- Category: Dessert
- Method: Baking
- Cuisine: American
Description
These simple, green cookies are soft and tender and loaded with two kinds of chocolate chips and crushed Oreo cookies. Yummo!
Ingredients
- 1 cup light brown sugar, packed
- ½ cup granulated sugar
- 1 cup salted butter, softened
- 2 large eggs
- 1 teaspoon vanilla extract
- ½ teaspoon green food coloring
- ½ teaspoon baking powder
- 1 teaspoon baking soda
- 3 cups all-purpose flour
- 1 cup semi-sweet chocolate chips
- 1 cup white chocolate chips
- 1 cup crushed Oreo cookies
Instructions
1. Get out and measure your ingredients.
2. Preheat the oven to 375 degrees Fahrenheit.
3. In a large bowl, cream together the sugars and the butter until the mixture is smooth and homogenous.
4. Whisk in the eggs, vanilla extract, and food coloring slowly until the ingredients are fully incorporated into the creamed sugar.
5. Gently whisk in the flour, baking powder, and baking soda until no clumps of dry ingredients remain in the cookie dough.
6. Gently fold in the chocolate chips, white chocolate chips, and crushed Oreo.
7. Stir until they are evenly distributed throughout the cookie dough.
8. Scoop balls of cookie dough the size of 2 tablespoons onto a cookie sheet and bake them for 8 minutes.
9. Allow the cookies to cool for about 5 minutes before removing them from the baking sheet.
10. Serve.
Notes
You can use either gel or liquid food coloring in this recipe. I find that the gel food coloring gives the cookies a richer color and does not fade as much during the cooking process.
You can store these cookies in an airtight container for up to 5 days. You can also store them in the freezer for up to 3 months. They are great reheated in the microwave for about 30 seconds.
If your cookies are spreading too much, simply allow the cookie dough to rest in the fridge for about 20 minutes before forming the balls of dough.