Strawberry pie filling is the kind of kitchen magic that makes your whole house smell like sunshine. Seriously, the second it hits the saucepan, the sweet berry aroma practically dances up your nose and wraps you in a warm, happy hug. And the best part? This homemade strawberry pie filling only takes five ingredients and about 20 minutes of your time — that’s less than one episode of your latest binge-worthy show.
Whether you’re prepping for a holiday dessert, planning to surprise your kiddos with a midweek treat, or just craving something bright and fruity in the dead of winter, strawberry pie filling has your back. It’s comforting, quick, and a total game-changer for bakers of all levels. Bonus: no weird preservatives or hard-to-pronounce ingredients. Just real strawberries and pantry basics. Keep reading because we’re about to dive into how to make the best strawberry pie filling step by step — no pie crust tears, no soggy middles, just pure strawberry bliss.
Table of Contents
What is Strawberry Pie Filling?
Strawberry pie filling is the thick, glossy, sweet-tart mixture that lives inside strawberry pies and makes your taste buds do a little happy dance. But it’s more than just a “pie thing.” It’s basically a sweet fruit compote that’s been thickened with cornstarch, sweetened just enough to complement the strawberries, and flavored with a touch of vanilla.
Traditionally, it’s used in baked or no-bake strawberry pies, but it also moonlights as a topping for cheesecakes, pancakes, waffles, and even shortcakes. The beauty of strawberry pie filling is how adaptable it is—you can make it chunkier, smoother, more tart, or extra sweet depending on your mood. It’s got just enough structure to hold its shape in a pie, but it’s soft and spoonable too. Unlike canned versions, which can sometimes taste overly sugary or artificial, this homemade version lets the flavor of fresh strawberries shine through. Oh, and did I mention it takes just minutes to make?
Reasons to Try Strawberry Pie Filling
Let’s be honest—canned pie filling gets the job done, but homemade strawberry pie filling? That’s where the magic happens. First off, the flavor is wildly better. Fresh strawberries have that juicy, sun-kissed sweetness that you just can’t replicate in a can. When you make it yourself, you’re in control. Want it sweeter? Add a bit more sugar.
Want a stronger strawberry punch? Toss in a few extra berries. It’s like having a backstage pass to your own flavor preferences. Plus, this recipe is quick—like, whip-it-up-before-the-kids-get-home quick. No need for fancy equipment or advanced pastry skills. Just a food processor, a saucepan, and a good whisk. And don’t underestimate the joy of knowing exactly what’s in your food—no corn syrup, no red dye #who-knows-what, just real ingredients you probably already have on hand. You can also batch it and refrigerate for later. Use it for desserts like this strawberry crunch poke cake or layer it in angel food cake strawberry jars. Oh, and it’s freezer-friendly, too—just sayin’.
Ingredients Needed to Make Strawberry Pie Filling
To make homemade strawberry pie filling, you’ll need:
- 2 lbs fresh strawberries, washed and stems removed
- ¾ cup granulated sugar
- 1 cup boiling water
- 3 tablespoons cornstarch
- 1 teaspoon vanilla extract
No fancy stuff, no preservatives—just real, simple ingredients. Make sure your strawberries are fresh (not frozen!) for the best flavor and texture. If they’re super ripe and sweet, you might even dial the sugar down a touch. Also, don’t skip the cornstarch—that’s your secret weapon for that perfect glossy finish.
Instructions to Make Strawberry Pie Filling – Step by Step
Step 1: Prep and Puree the Strawberries
Start by grabbing your freshest, juiciest strawberries—about two pounds worth. You’ll want to rinse them under cool water and gently pat them dry with a clean towel. Remove the stems (yes, all of them!), and divide the berries in half. Set aside one half for later. Take the other half (about 1½ cups) and toss them into a food processor fitted with the blade attachment. Pulse until they’re completely pureed. You’re looking for a smooth, pourable consistency—like a thick smoothie.
Now, a quick note for my texture-sensitive friends: if you prefer your pie filling extra smooth, you can strain the puree through a mesh sieve to remove the seeds. Totally optional, but definitely something to consider if you want that silky-smooth finish.
Step 2: Blend in the Sweet Stuff
Once your strawberries are pureed, it’s time to add the sugar, boiling water, and cornstarch straight into the food processor. Start with ¾ cup of granulated sugar—this adds the right balance of sweetness without going overboard. Pour in the cup of boiling water (carefully!), then spoon in 3 tablespoons of cornstarch. Blend everything together until it’s completely smooth and lump-free. Cornstarch is what gives the filling its signature glossy thickness, so make sure it’s well incorporated—no one wants starchy clumps in their pie!
If you’re curious about other ways to thicken pie fillings or need substitutes, check out this ingredient tips guide.
Step 3: Cook the Filling
Pour your strawberry mixture into a large saucepan and set it over medium heat. Grab a whisk—it’s your best friend here. You’ll need to whisk constantly while the mixture heats up. This prevents any lumps from forming and helps everything cook evenly. As the mixture comes to a boil, it might look a bit cloudy at first—don’t panic! That’s totally normal. Let it boil, whisking the whole time, for exactly three minutes. Set a timer if you need to. During this time, the cornstarch works its magic, thickening the mixture and giving it that shiny, luscious look we’re going for.
Step 4: Add the Vanilla and Let It Chill
Remove the pan from the heat right after your three-minute boil. Immediately whisk in 1 teaspoon of vanilla extract. This step is small but mighty—it adds warmth and depth to the filling, rounding out the tartness of the berries with a soft, fragrant sweetness. After adding the vanilla, give the mixture a few minutes to cool slightly. You’ll notice it becomes clearer and thicker as it sits. It might look like a strawberry lava lamp at this point, which is part of the charm.
Step 5: Fold in the Fresh Berries
Take the remaining strawberries you set aside earlier and slice them—quarter if they’re large, halve if they’re smaller. Gently fold the sliced strawberries into your slightly cooled mixture using a rubber spatula. You want to be gentle here so the berries don’t break down too much. The mix of puree and fresh chunks gives the pie filling great texture—it’s the best of both worlds.
If you’re planning to use this for something like a fluffy strawberry shortcake puppy chow, you can skip the chunks and go all smooth. It’s all about what you’re making it for.
Step 6: Use or Store
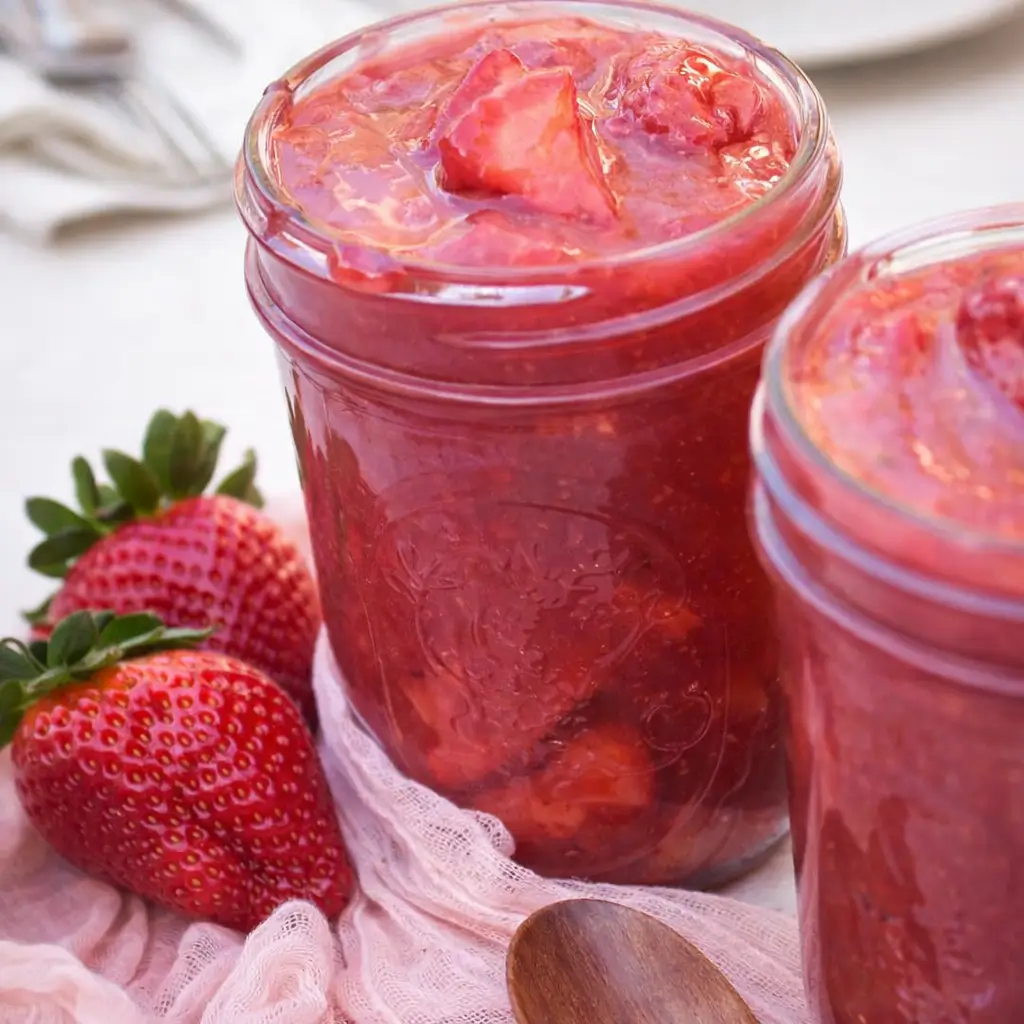
You’re officially done! At this point, you can spoon the filling directly into your prepared pie crust and pop it into the fridge to chill and set. Or, you can transfer it to clean, sterilized glass jars. Seal and refrigerate for up to 5 days. Just be sure to give it a good stir before using. Want to stash some for later? It freezes beautifully. Let it cool completely, spoon into freezer-safe containers, and freeze for up to three months.
What to Serve with Strawberry Pie Filling
Strawberry pie filling is incredibly versatile—think of it as your berry BFF in the kitchen. Of course, it’s perfect in a traditional pie shell topped with whipped cream. But don’t stop there. Use it as a topping for strawberry shortcake cookies, swirl it into yogurt, spoon it over pancakes, or layer it into a parfait. It also makes a dreamy topping for ice cream or cheesecake. And if you’re feeling extra, use it in a strawberry crunch cake or dollop it over a warm biscuit for a shortcut strawberry shortcake situation. It even adds a fruity punch to oatmeal if you’re trying to jazz up your breakfast game.
Key Tips for Making Strawberry Pie Filling
Use fresh, ripe strawberries. They’re the star of the show here, so pick berries that are sweet and deep red. Avoid using frozen strawberries—they release too much liquid and can mess with the texture. Whisk like your life depends on it during the boiling step. This keeps your filling smooth and prevents burning. If the mixture looks cloudy, don’t worry. It clears up as it cools. Don’t overcook—three minutes of boiling is all you need for that perfect, thick-but-not-gloopy consistency. And lastly, always taste before storing. If you like it sweeter, feel free to add a little extra sugar or even a splash of lemon juice if you want more zing.
Storage and Reheating Tips for Strawberry Pie Filling
Once cooled, store your strawberry pie filling in an airtight glass jar or container in the fridge for up to 5 days. Make sure it’s completely cool before sealing, or you’ll end up with condensation inside the jar (aka watery filling). If you’re not using it all right away, you can freeze it. Just leave about an inch of space at the top of your container to allow for expansion. Thaw overnight in the fridge and stir well before using. If the filling thickens too much in the fridge, you can warm it gently in a saucepan over low heat, stirring in a splash of water to loosen it up. But honestly? It’s just as delicious cold.
FAQs
Can I use frozen strawberries instead of fresh?
Nope. Frozen strawberries tend to release too much moisture and can water down the filling, making it soupy and hard to set.
How long does homemade strawberry pie filling last?
In the fridge, it lasts up to 5 days in an airtight container. Frozen, it can last up to 3 months.
Can I make it sugar-free?
Yes! Use your favorite sugar substitute, but keep in mind the flavor may change slightly depending on what you use.
Can I can this strawberry pie filling?
This recipe isn’t tested for canning. If you’re into canning, it’s safer to follow a USDA-approved recipe specifically designed for that.
Final Thoughts
Strawberry pie filling is the kind of recipe every home cook should have up their sleeve. It’s fast, flexible, and outrageously tasty. Whether you’re baking a classic pie, layering it into a no-bake dessert, or just sneaking spoonfuls straight from the jar (no judgment!), this simple strawberry pie filling recipe gives you sweet, bright, summery flavor all year long. It’s one of those recipes that makes you feel like a kitchen hero without the stress or mess. If you loved this, you’ll probably be obsessed with our strawberry loaf cake or strawberry cream cheese pastries. Ready to bring a little strawberry sunshine into your kitchen? Let’s get cooking and keep it sweet.
Follow us on Pinterest for weekly slow cooker inspiration, or join the conversation over on our Facebook page where fellow food lovers share their favorite comfort meal.
Print
Strawberry Pie Filling Recipe – Sweet, Fast & Homemade
- Prep Time: 15 minutes
- Cook Time: 5 minutes
- Total Time: 20 minutes
- Yield: 8
- Category: Breakfast, Brunch, Dessert, Sauce
- Method: Stovetop
- Cuisine: American, Southern
- Diet: Vegetarian
Description
Homemade strawberry pie filling is easier than you’d think to make! With just 5 ingredients and a quick prep, you’ll be on your way to a delicious sweet strawberry pie in no time at all.
Ingredients
- 2 lbs fresh strawberries, washed & stems removed
- 3/4 cup granulated sugar
- 1 cup boiling water
- 3 tbsp cornstarch
- 1 tsp vanilla extract
Instructions
1. Add 1 1/2 cups strawberries to the bowl of a food processor fitted with the blade attachment, then puree.
2. Add the sugar, boiling water, and cornstarch to the processor and blend until smooth.
3. Transfer the mixture to a large saucepan and bring to a boil over medium heat, whisking constantly. Boil for three minutes exactly.
4. Remove the skillet from heat immediately and whisk in the vanilla extract. Set aside.
5. Quarter the remaining berries, halving them if they’re on the small side. Add them to the skillet and fold in with a spatula.
6. Use immediately in a pie or transfer to clean glass jars, seal, and refrigerate until ready to use. Stir before using.
Notes
Don’t worry! The mixture will come to a boil over medium heat.
The mixture may appear cloudy while it boils, but it will become clear as it cools.
If the berries you are using are on the smaller side, you can halve them instead of quartering them.
Do NOT use frozen strawberries in this recipe.