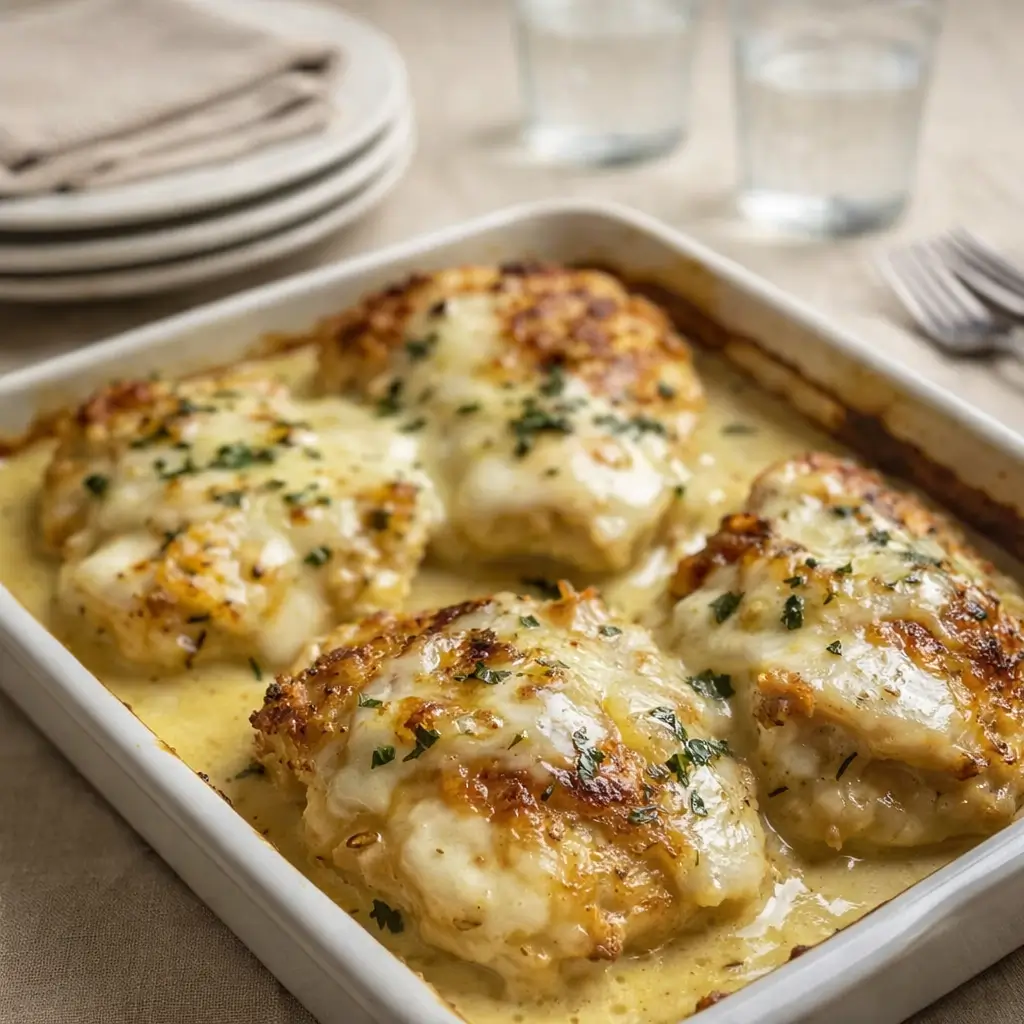
Best Keto Garlic Parmesan Chicken is about to become your new weeknight superhero. Let’s face it—between juggling work, kids’ activities, laundry piles that never quit, and the haunting question of “What’s for dinner?” by 5:03 PM, life is full. That’s where this recipe swoops in with its buttery, cheesy, low-carb magic. Packed with flavor, this easy chicken dish is simple enough for a Tuesday night but tasty enough to serve on a weekend when you’re hosting friends who low-key expect restaurant-quality meals.
Best of all? It’s keto-friendly, ready in under 40 minutes, and doesn’t require a million ingredients. It also happens to be picky-eater approved (yes, even the child who “hates everything” will be asking for seconds). Whether you’re diving into keto or just trying to cut carbs without sacrificing flavor, Best Keto Garlic Parmesan Chicken hits the sweet spot. Let’s dig into the crispy, cheesy, garlicky goodness—without breaking a sweat or the bank.
Table of Contents
What is Best Keto Garlic Parmesan Chicken?
Best Keto Garlic Parmesan Chicken is a low-carb, high-flavor dish made with boneless, skinless chicken breasts baked in a rich garlic butter sauce and topped with savory Parmesan cheese. It’s the kind of recipe that sounds fancier than it is—perfect for anyone trying to stick to a keto lifestyle without cooking separate meals for the rest of the family.
The garlic and Parmesan combo gives it a bold, comforting flavor, while the butter keeps it juicy and tender. There are no breadcrumbs or heavy coatings, so it stays well within your carb count. This dish bakes beautifully in the oven and develops a lightly crisped, golden cheese crust that’s utterly irresistible. Whether you’re new to keto or a seasoned pro, this meal satisfies that craving for something indulgent without the guilt. Plus, it’s versatile—serve it with a side of roasted veggies or your favorite salad, and dinner is handled. No fancy equipment, no long prep time, just pure cheesy goodness.
Reasons to Try Best Keto Garlic Parmesan Chicken
First, it’s ridiculously easy. We’re talking one baking dish, minimal prep, and only 10 ingredients—most of which you probably already have hanging out in your pantry. Second, it’s totally low-carb, so it fits beautifully into a keto or low-sugar lifestyle. But here’s the kicker—it doesn’t taste like “diet food.” In fact, the garlic butter and Parmesan combo gives it serious comfort food vibes without the carb coma afterward. Third, it’s flexible.
You can dress it up with sautéed spinach, serve it over cauliflower mash, or even slice it up for a keto-friendly salad topper. Busy weeknight? Check. Meal prep for lunches? Done. Hosting friends who don’t eat gluten? You’re golden. And if you’ve got kids who typically turn up their noses at anything green or grilled, the creamy, cheesy topping will win them over. Lastly, this dish is baked—not fried—making it a better-for-you option that still satisfies your crispy chicken cravings. Want more no-fuss dinner inspiration? Check out our One-Pan Healthy Ground Beef Pasta or Burger in a Bowl for equally easy, family-loved meals.
Ingredients Needed to Make Best Keto Garlic Parmesan Chicken
– 4 boneless, skinless chicken breasts
– 1 teaspoon garlic powder
– 1 teaspoon onion powder
– 1 teaspoon Italian seasoning
– ½ teaspoon salt
– ½ teaspoon black pepper
– ¼ cup grated Parmesan cheese
– ¼ cup unsalted butter, melted
– 2 tablespoons fresh parsley, chopped (for garnish)
Instructions to Make Best Keto Garlic Parmesan Chicken – Step by Step
Step 1: Preheat That Oven Like a Boss
First things first—get your oven preheated to 375°F (190°C). You don’t want to stick your chicken into a lukewarm oven. That’s a one-way ticket to sad, soggy chicken. Letting it preheat fully gives your chicken that golden, slightly crispy top we’re all dreaming of.
Step 2: Pat the Chicken Dry (Yes, It Matters!)
Grab your boneless, skinless chicken breasts and pat them dry with paper towels. This isn’t just some fancy chef thing—it’s actually super important. Moisture on the surface of the chicken can steam it instead of letting it brown. Dry chicken = better flavor + better texture.
Step 3: Make the Flavor Magic Happen
In a small bowl, mix together your garlic powder, onion powder, Italian seasoning, salt, and black pepper. This simple seasoning mix is the foundation of that savory flavor that’ll have everyone asking for seconds. Want a little kick? Add a pinch of crushed red pepper flakes.
Step 4: Rub It In Like You Mean It
Take your spice mix and give each chicken breast a nice rub-down. Get it on all sides—don’t be shy. This isn’t a light sprinkle kind of moment. This is full-on flavor massage. If your hands get messy, that means you’re doing it right.
Step 5: Butter Up Your Baking Dish
Melt your butter and pour it into a large baking dish, tilting the dish to coat the entire bottom. This buttery base not only keeps your chicken juicy while it bakes but also infuses the entire dish with rich, indulgent flavor. No butter left behind!
Step 6: Arrange the Chicken with Confidence
Place your seasoned chicken breasts right into the baking dish on top of the melted butter. Leave a bit of space between them so they bake evenly. Don’t crowd the pan—we want that golden browning action, not a steam bath.
Step 7: Shower It with Cheese (Generously!)
Now for the best part: Parmesan. Sprinkle that ¼ cup of grated Parmesan cheese generously over each chicken breast. If you want to go a little extra (we always do), you can mix in a bit of shredded mozzarella or even a touch of Asiago. More cheese = more joy.
Step 8: Bake to Golden Perfection
Pop that baking dish into your fully preheated oven and bake for 20–25 minutes. You’re looking for the chicken to reach an internal temp of 165°F (use a meat thermometer if you’ve got one). The cheese should be melted and slightly golden. And the kitchen? It’ll smell like an Italian bistro.
Step 9: Let It Rest—Yes, Like a Fine Steak
Once out of the oven, give your chicken a few minutes to rest. This helps the juices redistribute so every bite is tender and flavorful. Use this time to toss together a quick salad or reheat some roasted broccoli.
Step 10: Garnish and Serve with a Smile
Right before serving, sprinkle the top with freshly chopped parsley. It adds a pop of color and freshness that takes this dish from “weeknight basic” to “yes, I made this from scratch.” Now plate it up and watch your family or guests dig in with happy silence.
If you’re feeling inspired by the creamy Parmesan flavors, don’t miss our One-Pot Creamy Parmesan Chicken Pasta. It’s like a cozy blanket in food form—equally indulgent and family-approved.
What to Serve with Best Keto Garlic Parmesan Chicken
This dish is versatile, so pair it based on your mood or what’s in your fridge. For a classic keto combo, serve it with roasted garlic broccoli, cauliflower rice, or buttery sautéed spinach. If you want to switch things up, a fresh side like this Rainbow Orzo Salad (minus the orzo for strict keto!) adds a crisp, bright contrast. Need a heartier option? Try zucchini noodles tossed in olive oil and lemon. You can even slice the chicken and add it to a salad with cherry tomatoes and avocado for a killer lunch prep idea.
Key Tips for Making Best Keto Garlic Parmesan Chicken
Don’t skip drying your chicken—it’s the secret to that perfect golden top. Use freshly grated Parmesan for best texture and flavor; pre-shredded varieties can be a little dry or powdery. Check your chicken’s internal temperature—165°F is your magic number. If you’ve got thick chicken breasts, slice them in half horizontally to make them thinner and quicker to cook. And for even more garlic flavor, try adding a bit of minced fresh garlic to the melted butter. Bonus: you can double this recipe and store extras for easy lunches all week.
Storage and Reheating Tips Best Keto Garlic Parmesan Chicken
Store any leftovers in an airtight container in the fridge for up to 4 days. For best results, reheat in the oven at 350°F until warmed through—this helps maintain the chicken’s texture and avoids that dreaded microwave rubberiness. If you’re in a rush, a quick zap in the microwave works too, just go low and slow. You can even freeze portions for up to two months. Let them thaw overnight in the fridge, then reheat. This dish holds up well, making it a meal-prep superstar.
FAQs
Is this chicken really keto?
Absolutely! It’s low in carbs, high in protein, and uses no breadcrumbs or starches.
Can I use chicken thighs instead?
Totally. Just adjust the cooking time slightly since thighs can take a bit longer. Always check the internal temperature.
Can I make this ahead of time?
Yes! You can season the chicken and prep the dish in the morning, then bake it fresh at dinner. It’s also a great option for meal prep.
What if I don’t have Italian seasoning?
No problem! Use a combo of dried basil, oregano, and thyme instead. It’s still delicious.
Can I add veggies to the baking dish?
Sure thing. Just choose low-moisture ones like zucchini or bell peppers to avoid watering down the sauce.
Final Thoughts
Best Keto Garlic Parmesan Chicken is everything you need in a weeknight recipe—fast, easy, flavorful, and healthy. It checks all the boxes without asking you to dirty 16 pans or scour specialty stores for rare ingredients. Whether you’re following a keto lifestyle, feeding picky kids, or just looking for a no-fuss meal that actually tastes good, this recipe delivers. And if you’re craving more cozy dinners that don’t require culinary gymnastics, swing by Best Crockpot Marry Me Chicken for another hit that’s simple, satisfying, and downright irresistible. Happy cooking, friend!
Follow us on Pinterest for weekly slow cooker inspiration, or join the conversation over on our Facebook page where fellow food lovers share their favorite comfort meal.

Best Keto Garlic Parmesan Chicken: Low-Carb Comfort Food
- Prep Time: 15 minutes
- Cook Time: 20 minutes
- Total Time: 35 minutes
- Yield: 4 servings
- Category: Main Course
- Method: Bake
- Cuisine: American
Description
Juicy, flavorful, and low-carb, this Keto Garlic Parmesan Chicken is an easy one-pan dinner loaded with cheesy, garlicky goodness.
Ingredients
- 4 boneless, skinless chicken breasts
- 1 teaspoon garlic powder
- 1 teaspoon onion powder
- 1 teaspoon Italian seasoning
- ½ teaspoon salt
- ½ teaspoon black pepper
- ¼ cup grated Parmesan cheese
- ¼ cup unsalted butter, melted
- 2 tablespoons fresh parsley, chopped (for garnish)
Instructions
1. Preheat the Oven: Set your oven to preheat at 375°F (190°C).
2. Prepare the Chicken: Pat the chicken breasts dry with paper towels. This helps ensure they brown nicely.
3. Mix Spices: In a small bowl, combine garlic powder, onion powder, Italian seasoning, salt, and black pepper.
4. Season Chicken: Rub the spice mixture evenly over the chicken breasts to coat them thoroughly.
5. Prepare the Baking Dish: In a large baking dish, pour the melted butter to coat the bottom.
6. Arrange Chicken: Place the seasoned chicken breasts in the baking dish on top of the butter.
7. Add Parmesan: Sprinkle the grated Parmesan cheese generously over each chicken breast.
8. Bake the Chicken: Place the baking dish in the preheated oven and bake for 20-25 minutes or until the chicken is cooked through and the internal temperature reaches 165°F (75°C).
9. Garnish: Once done, remove the dish from the oven and let it rest for a few minutes. Before serving, garnish with freshly chopped parsley.
10. Serve: Your Keto Garlic Parmesan Chicken is ready to be served immediately!
Notes
For extra crispiness, broil the chicken for the last 2-3 minutes of baking. You can also add a sprinkle of mozzarella on top before baking for more cheesy goodness. Store leftovers in an airtight container in the refrigerator for up to 3 days.