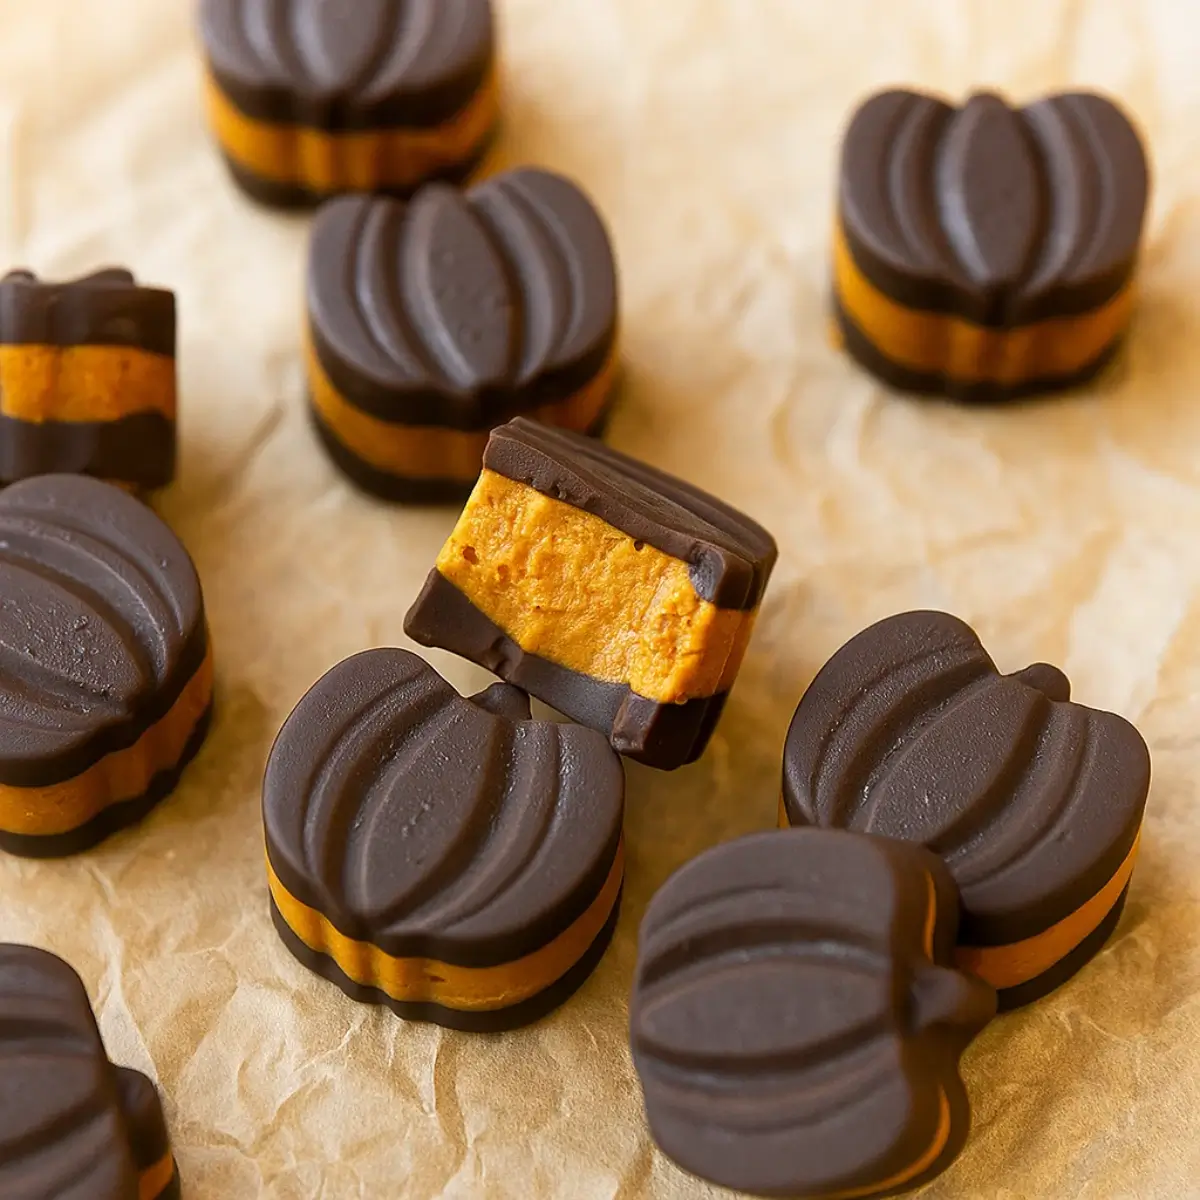
If there’s one fall treat I look forward to making every year, it’s Chocolate Pumpkin Butter Cups. They’re creamy, chocolatey, perfectly spiced, and—here’s the kicker—lower in sugar and dairy-free. It’s like if your favorite peanut butter cup and pumpkin pie decided to have a delicious little baby. My kids gobble these up, and honestly, I have to hide a few in the freezer if I want them to last more than 24 hours.
These are the kind of treats that make fall feel like magic—the cozy sweaters, the pumpkin candles, and that first cool breeze. And guess what? You only need a handful of ingredients and some freezer time. No candy thermometer, no fuss. Just sweet, spiced happiness wrapped in chocolate.
Table of Contents
Why You’ll Love These Chocolate Pumpkin Butter Cups
- Easy & Quick – Just 10 minutes of prep, the rest is chill time.
- Wholesome Ingredients – Pumpkin puree + almond butter = creamy goodness.
- Perfectly Seasonal – Pumpkin spice meets chocolate in the dreamiest combo.
- Dairy-Free & Lower Sugar – Treat yourself without the sugar crash.
What Do Chocolate Pumpkin Butter Cups Taste Like?
Imagine the classic Reese’s cup, but with a cozy autumn twist. The chocolate shell has that satisfying snap, and inside? A velvety pumpkin spice filling that’s sweet but not cloying. It’s smooth, nutty, and gently spiced—like pumpkin pie in bite-sized form.
Ingredients You’ll Need for Chocolate Pumpkin Butter Cups
One of my favorite things about making Chocolate Pumpkin Butter Cups is that the ingredient list is simple, wholesome, and pantry-friendly. You don’t need anything fancy—just a few everyday items that come together to create that dreamy, chocolate-meets-pumpkin-spice flavor we all crave in the fall.
For the Pumpkin Spice Filling:
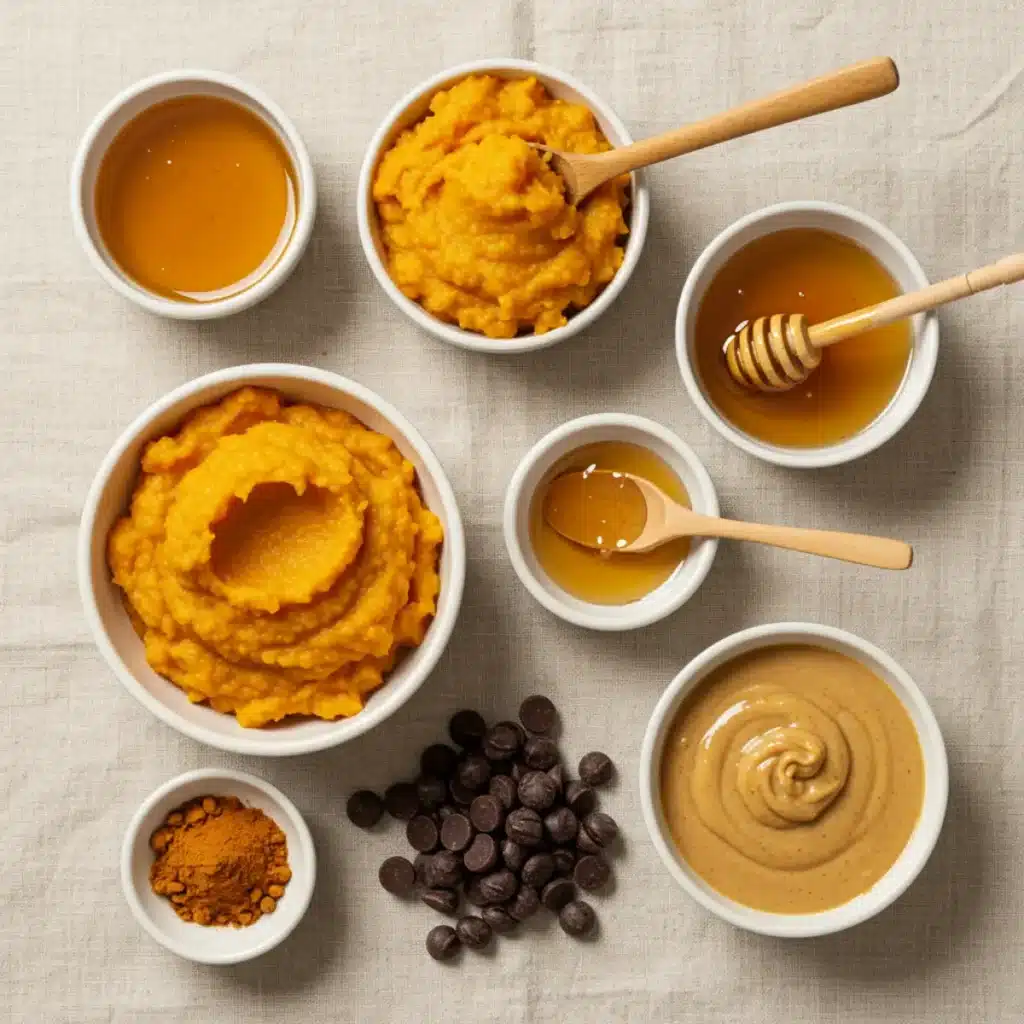
- ½ cup pumpkin puree – This is the star of the show! Be sure to grab pure pumpkin puree (not pumpkin pie filling). Pie filling is already sweetened and spiced, which would throw off the balance. Pumpkin puree gives these cups that rich, earthy fall flavor while also keeping the filling naturally creamy. I’ve also used leftover pumpkin from my Apple Pumpkin Streusel Muffins—nothing goes to waste in my kitchen!
- ⅓ cup almond butter – This adds richness, protein, and a nutty undertone that pairs beautifully with chocolate. You can absolutely swap in peanut butter, cashew butter, or even Sunbutter if you need a nut-free option. Each variation brings its own little twist to the recipe.
- 2 tablespoons honey – A touch of natural sweetness to balance the earthy pumpkin and spice. If you’re vegan, swap this out for maple syrup—it blends beautifully and adds that warm caramel-like depth.
- 2 teaspoons pumpkin spice – A cozy blend of cinnamon, nutmeg, ginger, and cloves. You can make your own or use a store-bought version. Either way, it’s the secret to giving these cups their unmistakable autumn flavor.
For the Chocolate Layer:
1 tablespoon coconut oil – This helps thin the chocolate so it coats smoothly and hardens with that perfect “snap” when you bite in.
1 cup chocolate chips – Dark chocolate works best here because it contrasts so well with the sweet pumpkin filling. But if you prefer semi-sweet or even dairy-free chocolate, go for it. I’ve tried them all, and each batch disappears just as quickly!
How to Make Chocolate Pumpkin Butter Cups (Step by Step)
Making Chocolate Pumpkin Butter Cups is easier than you might think—it’s really just a little layering, a little chilling, and a lot of chocolatey fun. Follow these detailed steps and you’ll have a batch of festive treats ready to pull from the freezer whenever the craving strikes.
Step 1: Prepare the Pumpkin Spice Filling
Start by softening your nut butter. Place ⅓ cup almond butter in a small microwave-safe bowl and warm it for about 30 seconds. This makes it smoother and much easier to mix.
Next, grab a medium mixing bowl and add your ½ cup pumpkin puree, the warmed almond butter, 2 tablespoons honey (or maple syrup if you’re making them vegan), and 2 teaspoons pumpkin spice. Whisk everything together until it’s silky and fully combined. The mixture should be thick yet spreadable, almost like frosting.
👉 Tip from my kitchen: I often make a double batch of this pumpkin filling because it also works beautifully spread on toast or stirred into oatmeal. It reminds me of the filling in my Apple Spice Cake, only creamier.
Step 2: Melt the Chocolate Layer
Now for the good stuff—the chocolate! Add 1 cup chocolate chips and 1 tablespoon coconut oil to a small glass bowl. Microwave in short bursts of 20 seconds, stirring in between each round, until the mixture is completely smooth and glossy.
If you don’t want to use the microwave, you can melt the chocolate using a double boiler on the stovetop. Just keep the heat low and stir constantly so the chocolate doesn’t scorch.
Step 3: Make the Chocolate Base
Take out your silicone candy molds (or mini muffin liners if that’s what you have). Pour a thin layer of the melted chocolate into the bottom of each mold—just enough to cover the base.
Tap the mold lightly on the counter to even out the chocolate. Then pop the molds in the freezer for about 10 minutes. This helps set the base layer so your pumpkin filling doesn’t sink through.
Step 4: Pipe in the Pumpkin Filling
Once your base layer is firm, it’s time to add the pumpkin spice goodness. Spoon the pumpkin mixture into a plastic sandwich bag, seal it, and snip off one corner to create a makeshift piping bag.
Pipe a small dollop of filling into the center of each mold, right on top of the chocolate layer. Try to keep it away from the edges so the final chocolate layer can fully cover it. Smooth the tops with the back of a spoon if needed.
Place the molds back in the freezer for another 5–10 minutes so the filling firms up slightly.
Step 5: Seal with More Chocolate
Now pour the remaining melted chocolate over the pumpkin filling, making sure each cup is fully covered. Use the back of a spoon to gently spread the chocolate to the edges.
Return the molds to the freezer and let them chill for 1–2 hours, or until the Chocolate Pumpkin Butter Cups are completely set and the filling is firm.
Step 6: Pop Out and Enjoy!
Once frozen solid, carefully pop the Chocolate Pumpkin Butter Cups out of the molds. Store them in an airtight container in your freezer so you can grab one (or two) whenever the craving hits.
Pro tip: Don’t leave them sitting out on the counter too long—they’ll soften quickly. These treats are meant to be enjoyed straight from the freezer, just like my kids do when they sneak in and grab one after dinner.
💡 And that’s it! With just a few simple steps, you’ve made your own homemade Chocolate Pumpkin Butter Cups—a cozy, seasonal twist on a classic candy favorite.
Tips and Tricks for Perfect Chocolate Pumpkin Butter Cups
- Don’t overfill the molds—thinner layers = easier bites.
- Use mini muffin liners if you don’t have candy molds.
- Always keep them stored in the freezer (they melt if left out too long).
- No piping bag? Use a sandwich bag with the corner snipped off.
Storage
Store these little gems in an airtight container in the freezer. They’ll keep for up to 3 months—though I’d be shocked if they lasted that long. In the fridge, the filling stays softer, so freezer is best.
FAQs
Can I make them vegan?
Yes! Just swap the honey for maple syrup.
Do I have to use almond butter?
Nope—peanut butter, cashew butter, or Sunbutter all work beautifully.
Can I make them nut-free?
Yes, use Sunbutter or tahini for a nut-free version.
Conclusion
These Chocolate Pumpkin Butter Cups are the perfect mix of chocolate indulgence and pumpkin spice coziness. They’re easy, freezer-friendly, and make such a fun seasonal treat to share (or keep all to yourself—I won’t tell!).
If you loved this recipe, you might also enjoy my Apple Pumpkin Streusel Muffins or cozy Coconut Curry Pumpkin Soup.
Go ahead—whip up a batch this weekend. And if you do, tag me on Instagram so I can see your beautiful pumpkin creations!
Follow us on Pinterest for weekly slow cooker inspiration, or join the conversation over on our Facebook page where fellow food lovers share their favorite comfort meal.
Print
Chocolate Pumpkin Butter Cups
- Prep Time: 20 minutes
- Cook Time: 0 minutes
- Total Time: 2 hours
- Yield: 12 butter cups
- Category: Dessert
- Method: No-Bake
- Cuisine: American
Description
Chocolate Pumpkin Butter Cups are a rich, festive treat made with creamy pumpkin spice filling wrapped in a smooth dark chocolate shell—perfect for fall snacking straight from the freezer.
Ingredients
For the Pumpkin Spice Filling:
½ cup pumpkin puree
⅓ cup almond butter
2 tbsp honey (or maple syrup for vegan)
2 tsp pumpkin spice
For the Chocolate Layer:
1 cup chocolate chips (dark, semi-sweet, or dairy-free)
1 tbsp coconut oil
Instructions
1. Warm almond butter in the microwave for 30 seconds until smooth.
2. In a medium bowl, whisk together pumpkin puree, warmed almond butter, honey or maple syrup, and pumpkin spice until creamy and well combined.
3. In a small bowl, microwave chocolate chips and coconut oil in 20-second bursts, stirring until melted and glossy.
4. Pour a thin layer of melted chocolate into silicone molds or mini muffin liners to cover the base. Tap to level and freeze for 10 minutes.
5. Spoon pumpkin filling into a plastic sandwich bag, snip the corner, and pipe a dollop onto each chocolate base, avoiding the edges. Freeze for another 5–10 minutes.
6. Pour remaining chocolate over the filling to seal. Smooth tops with a spoon and return to freezer for 1–2 hours until fully set.
7. Once frozen solid, pop the butter cups out of the molds and store in an airtight container in the freezer.
8. Enjoy straight from the freezer for best texture and flavor.
Notes
You can swap almond butter with peanut butter, cashew butter, or a nut-free option like Sunbutter.
Pumpkin filling doubles as a spread for toast or a mix-in for oatmeal.
These treats soften quickly at room temperature—store in the freezer and serve chilled.