Cookie Dough Protein Powder Balls are the kind of snack that checks every box — sweet, chewy, satisfying, and sneakily healthy. If you’ve ever found yourself sneaking spoonfuls of cookie dough from the mixing bowl (guilty as charged), you’re going to love this bite-sized upgrade. These little protein-packed gems taste like dessert but act like fuel, perfect for busy mornings, post-workout pick-me-ups, or 3 PM “please save me” slumps.
The beauty of Cookie Dough Protein Powder Balls is how fast and flexible they are — no oven, no fuss, and totally customizable. Whether you’re a peanut butter devotee or almond butter loyalist, you can tweak them to your taste without sacrificing flavor. They’re naturally sweetened, high in protein, and totally family-approved — even the picky eaters can’t resist them.
Table of Contents
What is Cookie Dough Protein Powder Balls?
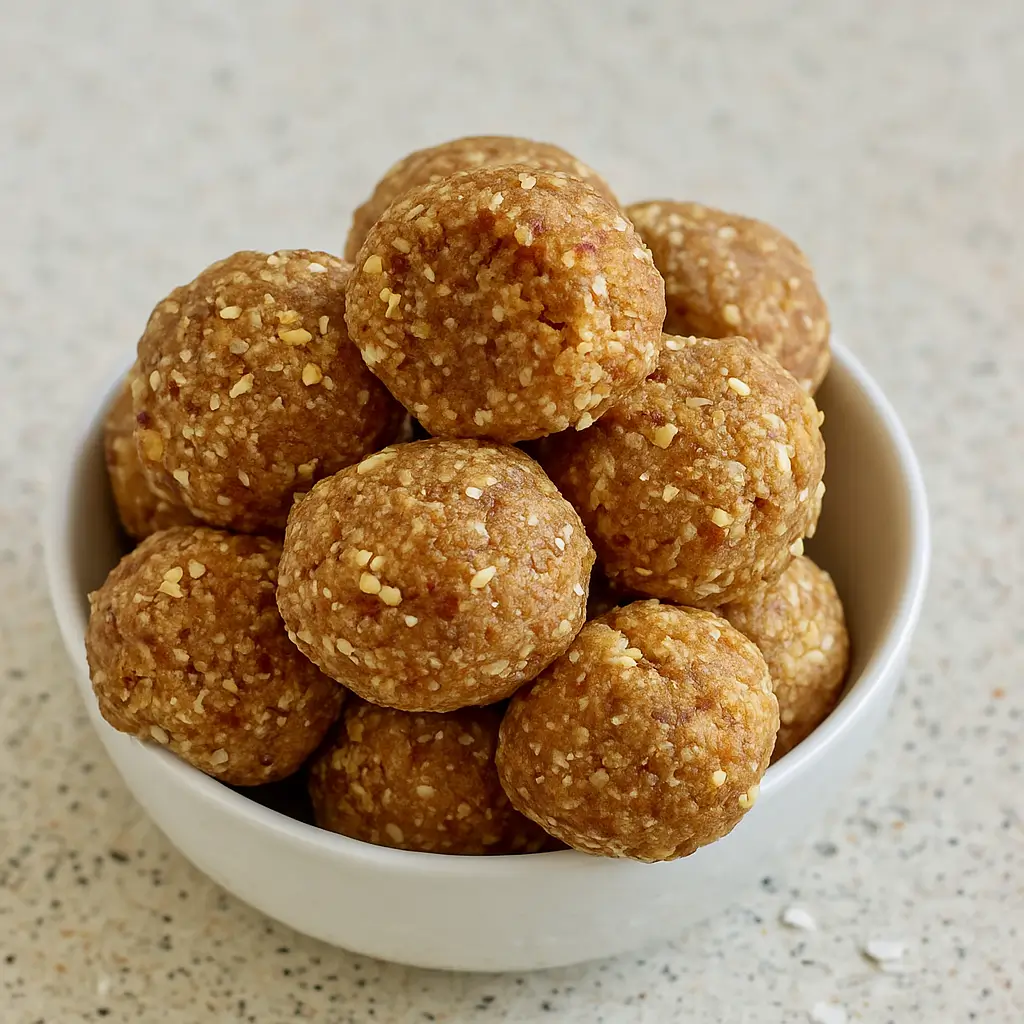
Cookie Dough Protein Powder Balls are no-bake energy bites made from wholesome ingredients like almond flour, protein powder, and nut butter — all blended into a doughy, cookie-like texture. The base comes together in minutes, creating a snack that’s soft, rich, and satisfying without refined sugar or processed junk. The protein powder adds muscle-loving nutrition, while the maple syrup and vanilla give them that classic cookie dough sweetness.
Think of them as the healthy cousin of your favorite cookie dough — indulgent without the guilt, sweet without the sugar crash. They’re a favorite among meal-preppers and busy moms because they’re portable, freezer-friendly, and totally customizable. You can toss in chocolate chips, flaxseed for fiber, or even collagen for an extra protein punch. These little bites feel like dessert but are balanced enough to fit right into your wellness goals.
Reasons to Try Cookie Dough Protein Powder Balls
First off, let’s be real — who doesn’t want an excuse to eat cookie dough and call it “fuel”? Cookie Dough Protein Powder Balls are the ultimate healthy indulgence. They’re quick to make, portable, and packed with protein to keep you full longer than a granola bar. Plus, they’re naturally gluten-free and can easily be made vegan or nut-free.
You don’t need fancy equipment or baking skills — just a bowl, a spoon, and maybe a sprinkle of patience (though honestly, you’ll probably eat one straight from the bowl). These balls are perfect for curbing late-night cravings or giving you a mid-afternoon lift. They’re also a lifesaver for anyone trying to stay on track with fitness goals without sacrificing flavor. And if you’re meal prepping for the week, they store beautifully in the fridge or freezer, ready whenever hunger hits.
Ingredients Needed to Make Cookie Dough Protein Powder Balls
- 1 cup almond flour (or finely ground oat flour for nut-free)
- 1/2 cup vanilla or cookie-flavored protein powder (whey or plant-based)
- 1/4 cup natural peanut butter (or almond, cashew, or sunflower seed butter)
- 3 tablespoons pure maple syrup (or honey)
- 2 tablespoons almond milk (or any milk), plus more as needed
- 2 tablespoons mini chocolate chips (dairy-free if needed)
- 1 teaspoon vanilla extract
- 1/8 teaspoon fine sea salt (adjust to taste)
- Optional: 1–2 tablespoons collagen peptides for extra protein, or 1 tablespoon flaxseed meal for fiber

Instructions to Make Cookie Dough Protein Powder Balls – Step by Step
Making these Cookie Dough Protein Powder Balls is so easy you’ll wonder why you ever bought expensive energy bites at the store. This step-by-step guide will walk you through everything from mixing to chilling, so you get that perfect soft, doughy texture every single time. Whether you’re meal prepping for the week or just want a healthy snack ready in 10 minutes, this is your go-to method.
Step 1: Mix the Dry Ingredients
Start your Cookie Dough Protein Powder Balls by gathering your dry ingredients. In a medium mixing bowl, combine the almond flour, protein powder, fine sea salt, and any optional add-ins like flaxseed meal or collagen peptides. Use a whisk to blend them together thoroughly. This step might feel basic, but it’s essential — whisking helps break up any protein powder clumps and evenly distributes the salt and supplements throughout the mix. The smoother your dry base, the better your dough will come together later.
If you’re using oat flour instead of almond flour (a great nut-free swap for school-safe snacks), make sure it’s finely ground — think soft and powdery, not gritty. If you’re not sure how to make your own oat flour, check out our simple guide in the Homemade Chickpea Potato Soup post, where we share easy blending tips that work for all kinds of flours.
Step 2: Stir the Wet Ingredients Together
Next, grab a second bowl for your wet ingredients — the “glue” that brings everything together. Add your peanut butter (or almond, cashew, or sunflower seed butter), maple syrup, vanilla extract, and 1 tablespoon of milk. Using a spoon or small whisk, stir until the mixture becomes smooth, glossy, and well combined. This creamy base should look rich and thick, almost like frosting.
If your nut butter is too stiff (looking at you, refrigerated peanut butter), pop it in the microwave for 10–15 seconds to soften it up. This small trick helps everything blend smoothly and avoids that crumbly texture that happens when the butter is too cold.
You can adjust sweetness here too — if you prefer a stronger maple flavor, add an extra drizzle. Want more of that classic cookie dough taste? Try using a touch more vanilla or swap maple syrup for honey, which gives a deeper flavor. For more natural sweetener ideas, check out our Sweet Potato and Chickpea Curry, where we share tips on balancing sweetness naturally in healthy dishes.
Step 3: Combine the Wet and Dry Mixtures
Now comes the fun part — combining everything! Pour your wet mixture into the dry ingredients. Using a spatula, stir to begin forming the dough. It might look crumbly at first, but keep mixing; the texture will come together as the flour absorbs the liquid. Once it starts looking more cohesive, ditch the spoon and use your hands to knead it gently.
The goal in this step-by-step process is to get a dough that’s soft, pliable, and slightly sticky — similar to actual cookie dough. If it feels too dry, add more milk one teaspoon at a time until it holds together when pinched. If it’s overly sticky, sprinkle in a touch more almond flour.
This is where you can really make the recipe your own. If you like a chewier bite, toss in a spoonful of shredded coconut or rolled oats. Craving extra protein? Add another scoop of collagen peptides. Every tweak is a chance to customize your Cookie Dough Protein Powder Balls to fit your taste and nutrition goals.
Step 4: Fold in the Chocolate Chips
Once your dough has reached the perfect consistency, it’s time to bring on the chocolate magic. Gently fold in your mini chocolate chips using a spatula or spoon. The mini chips are ideal because they distribute evenly throughout the dough, giving you that irresistible chocolatey bite every time.
If you’re feeling fancy (or want to impress someone on Instagram), reserve a few chips to press on top of each ball later for a bakery-style look. And for those following a dairy-free lifestyle, make sure to use dairy-free chips — they melt beautifully and taste just as indulgent.
This step might seem minor, but it’s what transforms your dough from “protein snack” into “dessert-worthy energy bite.” You could even mix things up with dark chocolate chunks, cacao nibs, or a sprinkle of cinnamon for a warm twist. For a fun flavor variation, check out our creamy Bang Bang Chicken recipe — the same balance of sweet and savory flavors works wonders in desserts too!
Step 5: Roll the Dough into Balls
Now that your dough is ready, let’s shape it into bite-sized perfection. Using a small cookie scoop or a tablespoon, portion out equal amounts of dough and roll them between your palms until smooth. The heat from your hands helps slightly soften the chocolate chips, creating that rich cookie dough aroma.
You should end up with about 14–16 Cookie Dough Protein Powder Balls, depending on how generous your scoops are (and how many “taste tests” happen along the way). For a prettier presentation, press a few extra chocolate chips on top of each ball.
If the dough starts sticking to your hands, lightly dampen your palms with water — this trick keeps everything smooth without adding extra flour.
Step 6: Chill the Cookie Dough Protein Powder Balls
Transfer your rolled balls to a parchment-lined plate or tray, and refrigerate them for 15–20 minutes. This chill step helps the texture firm up and the flavors meld together. While you’re waiting, you might as well brew some tea or prep tomorrow’s lunch — these bites will be ready before you know it.
Chilling isn’t just about texture; it also enhances the flavor. The cold helps the nut butter set, giving each bite a slightly denser, chewier finish. If you’re short on time, you can skip the chill — they’re still perfectly edible right away — but the cool version is worth the wait.
Step 7: Add Optional Finishing Touches
This last step is optional, but trust me, it’s worth it. Once the balls are chilled, you can roll them in crushed peanuts for crunch, sprinkle flaky sea salt for balance, or coat them lightly in cacao nibs for extra texture. Not only do these finishing touches make your Cookie Dough Protein Powder Balls look gorgeous, but they also add a gourmet feel that makes them café-worthy.
If you love experimenting with flavors and textures, you’ll enjoy our Sticky Garlic Chicken Noodles — the same “customize it your way” spirit applies beautifully here.
And there you have it — your complete step-by-step guide to making Cookie Dough Protein Powder Balls. No baking, no mess, no waiting for the oven to preheat — just a handful of ingredients, a few minutes, and a batch of soft, chewy, protein-packed bites ready to fuel your day. Keep them chilled, keep them handy, and most importantly — try not to eat them all at once.
What to Serve with Cookie Dough Protein Powder Balls
These little bites pair beautifully with your morning coffee or an afternoon protein smoothie. They’re perfect alongside a fruit bowl, a Greek yogurt parfait, or as a grab-and-go snack between meals. You can even crumble one into oatmeal or mix it into vanilla yogurt for a dessert-style treat. For a wholesome post-workout snack idea, try pairing them with our Miso Peanut Ramen Bowls for a balance of protein and healthy fats.
Key Tips for Making Cookie Dough Protein Powder Balls
Use a high-quality protein powder — it makes a huge difference in taste and texture. If your dough feels too dense, add milk gradually until it softens. For a nut-free version, use oat flour and sunflower seed butter. Want extra fiber? Add flaxseed or chia seeds. And don’t skip the chilling step — it helps the flavors meld and the texture firm up perfectly.
Storage and Reheating Tips for Cookie Dough Protein Powder Balls
Store your Cookie Dough Protein Powder Balls in an airtight container in the fridge for up to one week. For longer storage, freeze them for up to three months. To thaw, simply leave them at room temperature for 10 minutes. These bites don’t need reheating — they’re meant to be enjoyed cold or room temp for the best texture.
FAQs
Can I use a different sweetener? Yes! Honey or agave syrup work beautifully.
Can I make these vegan? Absolutely. Just use a plant-based protein and dairy-free chips.
Can I skip the protein powder? You can, but the texture and protein content will change slightly — add more almond flour to balance.
Can I double the batch? Please do. You’ll thank yourself later.
Final Thoughts
Cookie Dough Protein Powder Balls are proof that healthy snacks don’t have to be boring. They’re quick, satisfying, and taste like you’re cheating on your diet — without actually doing it. Whether you’re running between meetings, chasing kids, or hitting the gym, these little bites are your secret weapon for staying fueled and happy. For more wholesome ideas, check out our Sweet Potato and Chickpea Curry for a heartier, protein-packed meal.
Follow us on Pinterest for weekly slow cooker inspiration, or join the conversation over on our Facebook page where fellow food lovers share their favorite comfort meal.
Print
Cookie Dough Protein Powder Balls: The Easy No-Bake Snack You’ll Crave
- Prep Time: 10 minutes
- Cook Time: 0 minutes
- Total Time: 10 minutes
- Yield: 14–16 protein balls
- Category: Snack
- Method: No-Bake
- Cuisine: American
- Diet: Gluten Free
Description
These Cookie Dough Protein Powder Balls are a no-bake, high-protein snack that tastes like dessert but fuels your day. Made with wholesome ingredients and ready in minutes, they’re gluten-free, customizable, and perfect for meal prep.
Ingredients
- 1 cup almond flour (or finely ground oat flour for nut-free)
- 1/2 cup vanilla or cookie-flavored protein powder (whey or plant-based)
- 1/4 cup natural peanut butter (or almond, cashew, or sunflower seed butter)
- 3 tablespoons pure maple syrup (or honey)
- 2 tablespoons almond milk (or any milk), plus more as needed
- 2 tablespoons mini chocolate chips (dairy-free if needed)
- 1 teaspoon vanilla extract
- 1/8 teaspoon fine sea salt (adjust to taste)
- Optional: 1–2 tablespoons collagen peptides for extra protein, or 1 tablespoon flaxseed meal for fiber
Instructions
1. In a medium bowl, whisk together almond flour, protein powder, salt, and optional flaxseed. Break up any clumps—nobody likes a chalky bite.
2. In a separate bowl, combine nut butter, maple syrup, vanilla, and 1 tablespoon milk. Stir until smooth and glossy.
3. Add the wet mixture to the dry. Use a spatula or your hands to bring it together. Add milk 1 teaspoon at a time until it resembles soft cookie dough that holds shape. It should be pliable, not sticky.
4. Fold in chocolate chips. Keep some back for sprinkling on top if desired.
5. Scoop about 1 tablespoon per ball and roll between your palms. You should get 14–16 bites.
6. Place on a parchment-lined plate and chill for 15–20 minutes to firm up. Or eat one immediately if you can’t wait.
7. Optional: Roll in crushed peanuts, cacao nibs, or a pinch of flaky salt for extra texture and flavor.
Notes
You can use oat flour for a nut-free version.
Adjust the sweetness by swapping maple syrup with honey or a sugar-free alternative.
Collagen peptides or flaxseed meal add a bonus nutritional boost.
Store in an airtight container in the fridge for up to 1 week or freeze for longer shelf life.