Cookies and Cream Cinnamon Rolls are the breakfast mashup you never knew you needed but won’t be able to live without. If you are a fan of that classic chocolate sandwich cookie flavor, these fluffy, pillowy rolls will satisfy every craving. We often stick to the traditional cinnamon and sugar filling, but adding a massive amount of crushed cookies changes the game entirely. Imagine waking up to the smell of fresh yeast dough mingling with cocoa and vanilla. It is a heavenly experience that makes even the busiest Monday feel like a lazy Saturday morning. These Cookies and Cream Cinnamon Rolls are surprisingly easy to whip up, even if you aren’t a professional baker. You don’t need magic to get that perfect rise; you just need a little patience and some warm milk. Whether you are feeding a crowd of hungry kids or just treating yourself after a long week, this recipe delivers a whopping amount of joy in every bite. I love how the dark cookie crumbs create a beautiful swirl against the golden dough. It is a visual feast that looks like it came straight from a high-end bakery.
What is Cookies and Cream Cinnamon Rolls?
Cookies and Cream Cinnamon Rolls are a creative twist on the classic morning pastry. Instead of the standard cinnamon-heavy center, we fill these rolls with a decadent mixture of crushed chocolate sandwich cookies, brown sugar, and butter. The dough is a basic, enriched sweet yeast dough that remains soft and tender long after it comes out of the oven. Because we use real cookie bits, the texture is incredibly interesting, offering a slight crunch against the velvety bread. The final touch is a glossy vanilla icing that seeps into every crevice, making the rolls unbelievably moist. This isn’t just a snack; it is an indulgent dessert masquerading as breakfast. Many people call them Oreo rolls, but the “cookies and cream” name truly captures that nostalgic flavor profile we all adore. It is the perfect project for a rainy afternoon when you want your house to smell like a dream.
Reasons to Try Cookies and Cream Cinnamon Rolls
You should try Cookies and Cream Cinnamon Rolls because they are a guaranteed crowd-pleaser that breaks the monotony of plain toast or cereal. First, the flavor combination is iconic and universally loved by both kids and adults. Second, this recipe is a great way to practice working with yeast without feeling intimidated. It is a foolproof method that yields professional results every time. Third, these rolls are extremely freezer-friendly, meaning you can prep a batch and bake them whenever the craving hits. Fourth, they offer a stunning presentation that will make you look like a kitchen superstar at your next brunch or potluck. Finally, making these rolls is a fun, hands-on activity that brings a sense of accomplishment. There is something so satisfying about rolling out dough and seeing those perfect spirals take shape. It is a delicious victory that tastes even better than it looks.
Ingredients Needed to Make Cookies and Cream Cinnamon Rolls
- 3 ¾ cups (470g) all-purpose flour for a sturdy yet soft structure.
- ¼ cup (50g) granulated sugar to feed the yeast and sweeten the dough.
- 2 ¼ teaspoons (1 packet) active dry yeast to ensure a magnificent rise.
- ¾ cup (180ml) warm milk (110°F/45°C) to activate the yeast perfectly.
- ¼ cup (57g) unsalted butter, melted and cooled slightly.
- 1 large egg at room temperature for richness and color.
- ½ teaspoon salt to balance the sweetness of the filling.
- 20 chocolate sandwich cookies, crushed (about 2 cups) for that signature taste.
- ⅓ cup (67g) brown sugar to create a gooey, caramelized center.
- ¼ cup (57g) unsalted butter, softened to hold the filling together.
- 1 teaspoon vanilla extract to boost the aromatic profile.
- 1 ½ cups (180g) powdered sugar for a smooth, white icing.
- 2 tablespoons milk to reach the desired drizzling consistency.
- ½ teaspoon vanilla extract for the final flavor finishing touch.
Instructions to Make Cookies and Cream Cinnamon Rolls – Step by Step
Step 1: Activate the Yeast and Mix the Dough
The first phase of our Step by Step guide begins with the most critical part: waking up the yeast. Grab a small bowl and pour in your warm milk. You want it warm to the touch, like bath water, but not hot enough to kill the yeast. Sprinkle the active dry yeast over the milk and give it a tiny stir. Let it sit for about 5 minutes. You will know it is ready when it looks foamy and smells like fresh bread. While that bubbles away, take a large mixing bowl and whisk together your flour, sugar, and salt. Once the yeast is happy and frothy, pour it into the dry ingredients along with the melted butter and the egg. Use a sturdy spoon to stir everything together until a shaggy dough begins to form. If the dough feels too wet, don’t panic; we will fix that in the next stage of our Step by Step process.
Step 2: Knead for Strength and Texture
Now it is time for a little bit of a workout. Lightly flour your countertop and turn the dough out. This part of the Step by Step instructions is where the magic happens. Knead the dough by pushing it away with the heels of your hands, folding it back, and turning it. Continue this rhythm for about 8 to 10 minutes. You are looking for the dough to transform from a sticky mess into a smooth, elastic ball that bounces back when you poke it. If it sticks to your hands too much, sprinkle a tiny bit more flour, but be careful not to overdo it or the rolls will be tough. Once it is silky smooth, place it in a greased bowl and cover it with a clean kitchen towel. Set it in a warm, draft-free spot for about an hour. You want it to double in size, which is a glorious sight to see.
Step 3: Prepare the Cookie Filling
While your dough is growing, you can prepare the heart of the recipe. Take your chocolate sandwich cookies and put them in a large plastic bag. Use a rolling pin to crush them into small bits—some fine crumbs and some slightly larger chunks for texture. In a medium bowl, mix these crumbs with the brown sugar and a splash of vanilla. Keep your softened butter nearby, as you will need it to act as the “glue” for this delicious mixture. This Step by Step preparation ensures that when you finally spread the filling, every inch of the dough is covered in chocolatey goodness.
Step 4: Roll and Assemble the Spirals
Once your dough has doubled, gently punch it down to release the air. This is strangely therapeutic! Roll the dough out on a floured surface into a large rectangle, roughly 14×9 inches. In this Step by Step assembly, precision isn’t as important as evenness. Spread your softened butter all over the dough, leaving a tiny border at the edges. Sprinkle your cookie and sugar mixture generously over the butter. Use your hands to lightly press the crumbs into the dough so they stay put. Starting from the long side, roll the dough up tightly into a log. Use a sharp knife or even unflavored dental floss to cut the log into 12 even slices. Place these beautiful swirls into a greased 9×13 inch baking dish. Cover them again and let them rise for another 30 minutes. They will puff up and start snuggling against each other.
Step 5: Bake to Golden Perfection
Preheat your oven to 350°F (175°C). This Step by Step journey is almost at the finish line. Slide your baking dish into the center of the oven and bake for 20 to 25 minutes. You are looking for a light golden-brown color on the tops. The smell in your kitchen at this point will be absolutely hypnotic. While they bake, whisk together your powdered sugar, milk, and vanilla to create the icing. Once the rolls are out, let them cool for just a few minutes. You want them warm enough to melt the icing slightly so it runs down into the middle, but not so hot that the icing completely disappears. Drizzle it over the rolls with a spoon or a whisk. Serve them while they are still warm and watch them vanish in seconds.
What to Serve with Cookies and Cream Cinnamon Rolls
Since these Cookies and Cream Cinnamon Rolls are quite rich and sweet, they pair beautifully with a strong cup of black coffee or a cold glass of milk. If you are serving them as part of a larger brunch, consider balancing the sugar with something savory. A side of crispy bacon or a simple vegetable frittata works wonders. Fresh fruit, like tart strawberries or raspberries, also provides a nice acidic contrast to the heavy chocolate flavor. For a truly indulgent experience, you could even serve them with a small scoop of vanilla bean ice cream for a “Cookies and Cream” dessert extravaganza. No matter what you choose, these rolls will definitely be the star of the show.
Key Tips for Making Cookies and Cream Cinnamon Rolls
To get the best results with your Cookies and Cream Cinnamon Rolls, always ensure your egg and butter are at room temperature. Cold ingredients can shock the yeast and slow down the rising process. If your house is chilly, turn your oven on for just one minute, then turn it off and place the dough inside to rise in the residual warmth. For the cleanest cuts when slicing your rolls, use a piece of unflavored dental floss. Slide the floss under the log, cross it over the top, and pull quickly. This prevents squishing the dough like a knife might. Also, don’t be afraid to leave some larger cookie chunks in the filling; they provide a delightful texture that makes these rolls feel extra special and homemade.
Storage and Reheating Tips Cookies and Cream Cinnamon Rolls
If you happen to have leftovers, which is rare, you can store your Cookies and Cream Cinnamon Rolls in an airtight container at room temperature for up to two days. If you want them to stay fresh longer, keep them in the fridge for up to five days. To recapture that “just-baked” magic, simply pop a roll in the microwave for about 10 to 15 seconds. This softens the dough and makes the icing gooey again. You can also freeze the unbaked rolls after slicing them. Just let them thaw and rise in the fridge overnight before baking them the next morning. It is a fantastic way to have a fresh breakfast ready with zero effort on a busy day.
FAQs
Can I use a different type of cookie? Yes! While chocolate sandwich cookies are classic, you can try golden sandwich cookies or even peanut butter filled ones for a different vibe.
My dough didn’t rise, what happened? Usually, this means the yeast was old or the milk was too hot and killed it. Always check the expiration date on your yeast packet.
Can I make these overnight? Absolutely. After placing the sliced rolls in the baking dish, cover them and put them in the fridge. The next morning, let them sit at room temperature for 45 minutes before baking.
Final Thoughts
Making Cookies and Cream Cinnamon Rolls is a rewarding way to bring a little extra sweetness into your home. This recipe proves that you don’t need to be an expert to create something spectacular. The combination of soft dough and crunchy cookies is a winner every time. I hope this guide gives you the confidence to dive into baking and share something wonderful with your loved ones. Remember, the best part of baking is the joy of sharing the final result. Go ahead, grab your rolling pin, and get started on these decadent rolls today. You won’t regret it when you take that first warm, chocolatey bite of pure bliss.
Follow us on Pinterest for weekly slow cooker inspiration, or join the conversation over on our Facebook page where fellow food lovers share their favorite comfort meal.
Print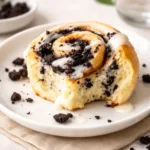
Cookies and Cream Cinnamon Rolls: The Ultimate Sweet Treat
- Prep Time: 20 minutes
- Cook Time: 25 minutes
- Total Time: 2 hours 15 minutes
- Yield: 12 rolls
- Category: Breakfast
- Method: Baking
- Cuisine: American
- Diet: Vegetarian
Description
Soft, fluffy rolls filled with crushed chocolate sandwich cookies and brown sugar, then drizzled with a smooth vanilla icing. These Cookies and Cream Rolls are a decadent twist on classic cinnamon rolls, perfect for breakfast or dessert.
Ingredients
FOR THE DOUGH:
- 3 3/4 cups (470g) all-purpose flour
- 1/4 cup (50g) granulated sugar
- 2 1/4 teaspoons (1 packet) active dry yeast
- 3/4 cup (180ml) warm milk (110°F/45°C)
- 1/4 cup (57g) unsalted butter, melted
- 1 large egg
- 1/2 teaspoon salt
FOR THE FILLING:
- 20 chocolate sandwich cookies, crushed (about 2 cups)
- 1/3 cup (67g) brown sugar
- 1/4 cup (57g) unsalted butter, softened
- 1 teaspoon vanilla extract
FOR THE ICING:
- 1 1/2 cups (180g) powdered sugar
- 2 tablespoons milk
- 1/2 teaspoon vanilla extract
Instructions
1. In a small bowl, dissolve the yeast in warm milk and let sit for 5 minutes until foamy. In a large bowl, combine flour, sugar, and salt. Add melted butter, egg, and yeast mixture. Stir until a dough forms, then knead on a floured surface for 8 to 10 minutes until smooth and elastic. Place in a greased bowl, cover, and let rise for 1 hour or until doubled in size.
2. In a bowl, mix crushed cookies, brown sugar, and vanilla extract. Set aside.
3. Roll the risen dough into a 14×9-inch rectangle. Spread softened butter evenly over the dough, then sprinkle the cookie mixture evenly on top, pressing lightly.
4. Roll the dough tightly into a log from the longer side. Cut into 12 even slices and place in a greased baking dish. Cover and let rise for 30 minutes.
5. Preheat oven to 350°F (175°C). Bake for 20 to 25 minutes or until golden brown. Cool for 5 to 10 minutes.
6. Whisk together powdered sugar, milk, and vanilla extract until smooth. Drizzle over warm rolls and serve immediately.
Notes
Use room temperature ingredients for best dough texture and proper yeast activation.
If the dough feels too sticky, add flour one tablespoon at a time until smooth and elastic.
For a stronger cookies and cream flavor, increase the amount of crushed cookies in the filling.
Store leftovers in an airtight container at room temperature for up to 2 days or refrigerate for up to 5 days. Reheat in the microwave for 10 to 15 seconds before serving.