Ditalini Pasta Salad is the absolute hero of every backyard barbecue and frantic weeknight dinner I’ve ever hosted. If you are a busy mom or a professional trying to balance a million things, you know the struggle of finding a side dish that everyone actually eats. This Ditalini Pasta Salad saves the day because it is incredibly fast to throw together and stays fresh in the fridge for days. I remember the first time I brought this to a neighborhood potluck; I barely got a scoop for myself before the bowl was scraped clean. It has that perfect mix of tiny, chewy pasta shapes and a zesty, creamy dressing that makes people go back for thirds. Since the pasta is so small, every single bite gives you a little bit of everything—crunchy cucumbers, juicy tomatoes, and that tangy Dijon kick. You won’t believe how much flavor we can pack into such a simple bowl. Honestly, it is the kind of recipe that makes you look like a kitchen pro without actually spending three hours over a hot stove. If you need something reliable, delicious, and kid-approved, this is your new best friend.
What is Ditalini Pasta Salad?
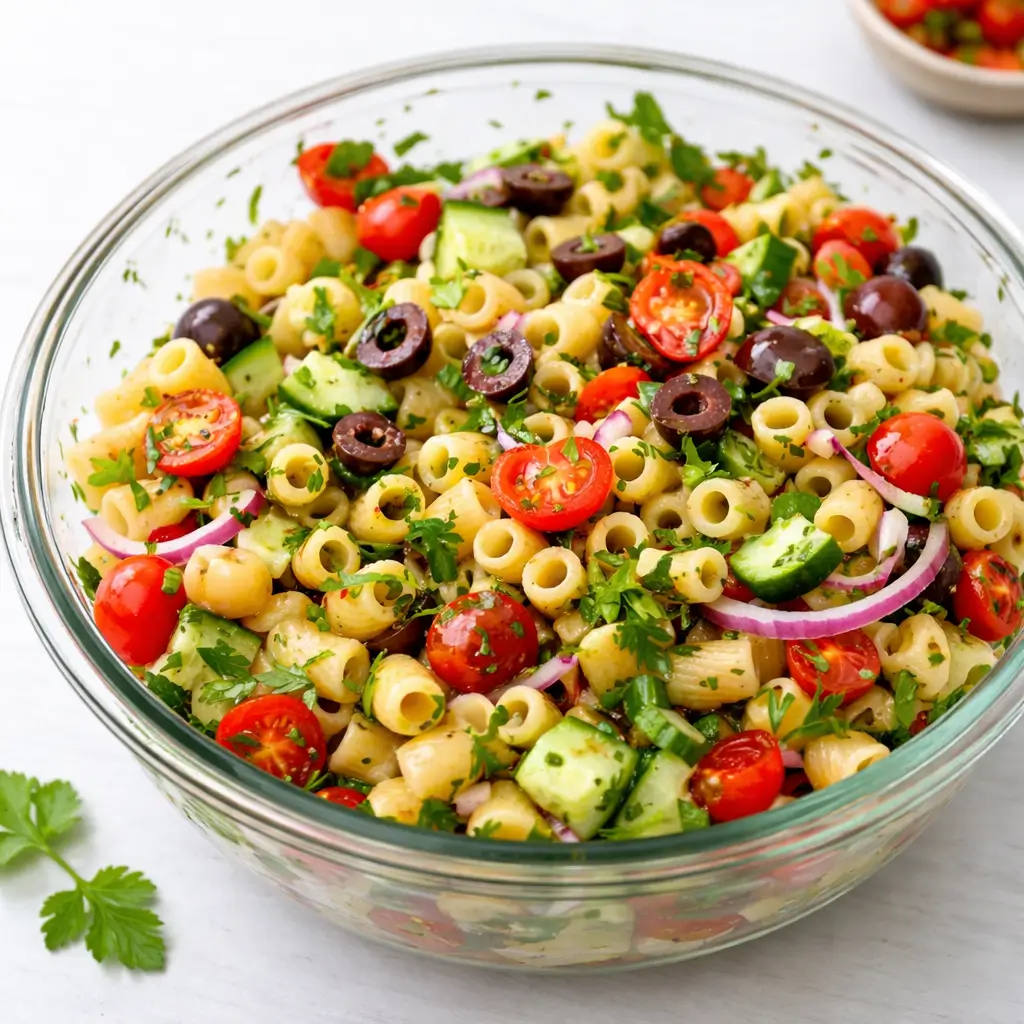
Ditalini Pasta Salad is a classic American side dish that features “little thimbles” of pasta tossed with fresh garden vegetables and a rich, mayonnaise-based dressing. Unlike a heavy macaroni salad that can sometimes feel a bit gloopy, this version stays light and bright thanks to the addition of sour cream. The name “ditalini” refers to the specific shape of the pasta, which is small, short, and tube-like. This shape is traditionally used in soups like pasta e fagioli, but it works wonders in cold salads because the hollow centers trap the creamy dressing. It’s a nostalgic dish that reminds many of us of summer picnics, yet it feels modern enough for a chic brunch. Because the ingredients are chopped small to match the size of the pasta, the texture is uniform and satisfying. It’s basically the more sophisticated, fun-sized cousin of the standard pasta salad you see at the grocery store deli counter.
Reasons to Try Ditalini Pasta Salad
You should definitely try Ditalini Pasta Salad because it is one of the most versatile recipes in your repertoire. First, it is a massive time-saver for anyone with a packed schedule. You can boil the pasta and chop the veggies in the time it takes to watch a quick sitcom episode. Second, it is surprisingly budget-friendly since it relies on pantry staples like mayo, vinegar, and dried pasta. If you have picky eaters at home who normally pick out onions or peppers, the small dice makes everything blend together so they might actually try a vegetable for once. Another great reason is the “make-ahead” factor. While some salads get soggy, this one actually tastes better after a few hours in the fridge. The pasta soaks up the seasonings, making every bite a tiny explosion of flavor. Plus, it transports easily in a Tupperware container, so you don’t have to worry about spills on your way to the park or a friend’s house. It is simply a winning combination of texture, taste, and total convenience.
Ingredients Needed to Make Ditalini Pasta Salad
- 8 oz ditalini pasta: These tiny tubes are the star of the show and provide a fun, chewy base for the entire dish.
- 1 cup cherry tomatoes: I like to halve these so they release their sweet juices into the mix.
- 1 small cucumber: Dicing this finely adds a refreshing crunch that cuts through the creamy dressing.
- 1⁄2 red bell pepper: This provides a beautiful pop of color and a mild, sweet flavor.
- 1⁄4 cup red onion: Make sure to dice this very finely so the bite isn’t too overwhelming for the kids.
- 1⁄4 cup sliced black olives: These add a salty, briny depth that balances the sweetness of the tomatoes.
- 1⁄4 cup fresh parsley: Fresh herbs really wake up the dish and keep it feeling light.
- 3⁄4 cup mayonnaise: This creates the rich, classic base for our homemade dressing.
- 1⁄4 cup sour cream: Adding this provides a lovely tang and a smoother texture than mayo alone.
- 1 tbsp Dijon mustard: This adds a tiny bit of zing and helps emulsify the dressing.
- 1 tsp sugar: Just a touch of sweetness balances the vinegar and salt perfectly.
- 1⁄2 tsp garlic powder: Essential for that savory, punchy undertone we all love.
- 1⁄2 tsp salt: To bring out all the natural flavors of the fresh veggies.
- 1⁄4 tsp black pepper: Adds a subtle warmth to the finish.
Instructions to Make Ditalini Pasta Salad – Step by Step
Step 1: Boiling the Pasta to Perfection
The first move in our Step by Step journey is getting that pasta just right. You want to fill a large pot with water and add a generous palmful of salt. People often forget that the water should taste like the sea; this is your only chance to season the pasta itself from the inside out. Once the water hits a rolling boil, drop in your ditalini. Now, keep a close eye on the clock because these little guys cook fast. You are aiming for “al dente,” which means the pasta still has a slight bite to it. If you overcook it, the salad will turn into a mushy mess once the dressing hits. When it’s ready, drain the pasta in a colander and immediately hit it with cold running water. This stops the cooking process instantly and washes away excess starch so the tubes don’t stick together in a big clump.
Step 2: Prepping Your Garden Fresh Veggies
While your pasta is cooling off, it is time to get your chop on for this Step by Step guide. Consistency is the secret sauce here. Since ditalini are so small, you want your cucumbers, bell peppers, and onions to be roughly the same size. This ensures that you don’t end up with one massive chunk of onion in an otherwise delicate bite. Halve those cherry tomatoes and slice up your black olives. If you want to keep the salad looking vibrant, make sure your parsley is chopped finely but not turned into dust. Toss all these colorful gems into a large mixing bowl. The visual of the red, green, and black against the white pasta is honestly half the fun of making this recipe.
Step 3: Whisking the Dreamy Creamy Dressing
Now we move to the most important Step by Step part: the dressing. In a medium-sized separate bowl, grab your whisk. Combine the mayonnaise and sour cream first until they are totally smooth. Then, pour in Dijon mustard, and that little teaspoon of sugar. Sprinkle in your garlic powder, salt, and pepper. Whisk it like you mean it! You want a silky, uniform liquid with no lumps of mayo left behind. Give it a tiny taste test right now. It should be tangy, slightly sweet, and very savory. If it feels too thick, a tiny splash of milk or water can loosen it up, but usually, the vinegar does the trick.
Step 4: Bringing the Magic Together
Now comes the satisfying part of the Step by Step process where everything joins forces. Pour your cooled, drained pasta into the big bowl with the veggies. Then, drizzle that glorious dressing all over the top. Use a large rubber spatula or a big spoon to toss everything gently. You want to be thorough so every single tiny tube of pasta is coated in dressing, but be gentle enough that you don’t crush the tomatoes. Watch as the dressing fills the centers of the ditalini—that is exactly what we want. It looks a bit wet at this stage, but don’t worry, the pasta is going to soak some of that up as it sits.
Step 5: The Chill Factor
You might be tempted to dive in right now, but this Step by Step instruction requires a little patience. Cover the bowl tightly with plastic wrap or a lid and slide it into the refrigerator. It needs at least one hour, though two or three is even better. This time in the “cold zone” allows the flavors to marry and the pasta to fully absorb the seasoning. It transforms from a bowl of separate ingredients into a cohesive, delicious salad. If you skip this, the flavor will be a bit flat, so go take a nap or fold some laundry while the fridge does the hard work for you.
Step 6: Final Tweak and Serve
After the salad has chilled, take it out and give it one more good stir. You might notice the dressing has thickened up. This is the moment for your final Step by Step quality check. Taste a spoonful. Does it need a pinch more salt? Maybe another crack of black pepper? If it looks a little dry because the pasta was extra thirsty, you can stir in an extra tablespoon of mayo or sour cream to refresh that glossy look. Once you are happy with the flavor, transfer it to a pretty serving bowl, garnish with a little extra parsley if you’re feeling fancy, and put it on the table. Watch your family dive in!
What to Serve with Ditalini Pasta Salad
This Ditalini Pasta Salad is the ultimate wingman for almost any main dish. It pairs beautifully with classic grilled favorites like juicy hamburgers, hot dogs, or BBQ ribs. If you are keeping things a bit lighter, it is a fantastic companion to grilled chicken breasts or a nice piece of seared salmon. For a vegetarian-friendly lunch, you can serve it alongside a big green salad or some roasted corn on the cob. Since it has a creamy profile, it balances out spicy foods really well, so try it next to some buffalo wings or spicy grilled shrimp. Honestly, I’ve even been known to eat a giant bowl of it all by itself for a quick lunch while standing at the kitchen counter. It’s that good.
Key Tips for Making Ditalini Pasta Salad
To ensure your salad is the talk of the town, remember a few pro tips. First, don’t overcook the pasta! Mushy pasta is the enemy of a good salad. Second, make sure the pasta is completely cold before you add the mayo-based dressing. If the pasta is even slightly warm, it will melt the mayo and turn the whole thing oily and unappealing. Also, don’t be afraid to customize the veggies. If you hate olives, swap them for chopped celery or even some shredded carrots. If you want a bit of heat, a pinch of red pepper flakes in the dressing goes a long way. Lastly, use high-quality mayonnaise; it really makes a difference in the final mouthfeel and richness of the dish.
Storage and Reheating Tips Ditalini Pasta Salad
Storing this salad is a breeze. You can keep it in an airtight container in the refrigerator for up to 3 to 4 days. In fact, many people think it tastes even better on day two! Just a heads-up: the pasta will continue to absorb the moisture from the dressing over time. If you find it’s a bit dry the next day, just stir in a tiny bit of water or an extra dollop of sour cream to bring back that creamy texture. Whatever you do, do not freeze this salad. Mayonnaise-based dressings separate and turn grainy when frozen and thawed, which is definitely not the vibe we are going for. Since it’s served cold, there’s no reheating required—just grab a fork and enjoy!
FAQs
Can I use a different pasta shape? Absolutely! If you can’t find ditalini, elbow macaroni or small shells work perfectly as well.
Can I make this vegan? Yes, you can easily use vegan mayonnaise and a dairy-free sour cream alternative (or just extra vegan mayo and a bit more vinegar).
Is this salad gluten-free? Only if you use a certified gluten-free pasta. The rest of the ingredients are naturally gluten-free, but always check your labels on the dressing components!
Can I add protein? Definitely. Adding canned tuna, grilled chicken, or even some cubed ham makes this a much heartier meal.
Final Thoughts
Making a Ditalini Pasta Salad shouldn’t be a stressful event. It’s all about fresh ingredients, a little bit of chopping, and a whole lot of creamy goodness. Whether you are prepping for a big holiday bash or just trying to survive a Tuesday, this recipe is a guaranteed winner. It’s simple, reliable, and brings a little bit of joy to the dinner table. So, grab your pot and start boiling that water—you are just minutes away from the best side dish you’ve had all year. Trust me, your family will be asking for the recipe before the meal is even over. Enjoy every bite!
Follow us on Pinterest for weekly slow cooker inspiration, or join the conversation over on our Facebook page where fellow food lovers share their favorite comfort meal.
Print
Ditalini Pasta Salad
- Prep Time: 10 minutes
- Cook Time: 10 minutes
- Total Time: 20 minutes
- Yield: 6 servings
- Category: Side Dish
- Method: Boiling
- Cuisine: American
- Diet: Vegetarian
Description
This creamy ditalini pasta salad is packed with fresh tomatoes, cucumbers, olives, bell peppers, and tossed in a tangy Dijon dressing. It’s the perfect crowd-pleasing side dish for any cookout or gathering.
Ingredients
- 8 oz ditalini pasta, uncooked
- 1 cup cherry tomatoes, halved
- 1 small cucumber, diced
- 1/2 red bell pepper, diced
- 1/4 cup red onion, finely diced
- 1/4 cup sliced black olives
- 1/4 cup fresh parsley, chopped
- 3/4 cup mayonnaise
- 1/4 cup sour cream
- 1 tablespoon white vinegar
- 1 tablespoon Dijon mustard
- 1 teaspoon sugar
- 1/2 teaspoon garlic powder
- 1/2 teaspoon salt
- 1/4 teaspoon black pepper
Instructions
1. Cook the ditalini pasta in a large pot of salted boiling water according to package directions until al dente. Drain and rinse under cold water until cooled. Transfer to a large bowl.
2. Add the cherry tomatoes, cucumber, red bell pepper, red onion, olives, and parsley to the bowl with the pasta.
3. In a separate bowl, whisk together the mayonnaise, sour cream, white vinegar, Dijon mustard, sugar, garlic powder, salt, and black pepper until smooth and creamy.
4. Pour the dressing over the pasta salad and toss gently until everything is evenly coated.
5. Cover and refrigerate the pasta salad for at least 1 hour to allow the flavors to meld.
6. Stir well before serving, taste, and adjust seasoning with additional salt and pepper if needed. Serve chilled.
Notes
For best flavor, chill the salad for at least one hour before serving.
You can add shredded cheddar cheese or diced salami for extra flavor.
Store leftovers in an airtight container in the refrigerator for up to 3 days.