Protein Cookie Dough — yes, you heard that right! Imagine that sweet, nostalgic taste of classic cookie dough, but this time it’s actually good for you. This recipe is every fitness lover’s (and late-night snacker’s) dream come true. It’s soft, chewy, and packed with about 10 grams of protein per serving. So, if you’ve ever found yourself standing in the kitchen at 9 p.m.
craving something sweet but not wanting to undo your day’s progress—this is your new go-to. Made with almond flour, creamy peanut butter, and vanilla protein powder, this treat satisfies your sweet tooth without the guilt. Plus, it takes just about five minutes from start to finish—because let’s be honest, no one has time for complicated desserts when the craving hits hard.
Table of Contents
What is Protein Cookie Dough?
Protein Cookie Dough is basically your childhood cookie dough reimagined for grown-ups who still love dessert but want to feel good about eating it. It skips the raw eggs and refined sugar, replacing them with wholesome ingredients like almond flour and maple syrup. What makes it shine is that it’s rich in flavor yet nutrient-dense—each scoop offers a dose of healthy fats, fiber, and protein.
You can enjoy it straight from the bowl, portion it into snack bites, or even crumble it over yogurt for a fun twist. The texture? Smooth, chewy, and delightfully rich, just like the dough you used to sneak from the mixing bowl. If you’ve tried recipes like Protein Brownie Bites or Cookie Dough Protein Powder Balls, you’ll love this one. It’s that same blend of indulgence and balance, perfect for busy days or a post-gym treat.
Reasons to Try Protein Cookie Dough
There’s no shortage of reasons to make Protein Cookie Dough a regular in your snack lineup. First off—it’s quick. Like, “done before your coffee cools” quick. With just one bowl and five minutes, you’ve got a dessert or snack that tastes like cookie dough but fuels your body like a protein bar. It’s also endlessly flexible—swap the peanut butter for almond or cashew butter, throw in some nuts, or drizzle a little melted chocolate on top if you’re feeling fancy.
Plus, it’s naturally gluten-free and can easily be made vegan depending on your protein powder choice. Beyond that, this dough is the ultimate multitasker—great as a pre-workout bite, afternoon pick-me-up, or even a late-night snack that won’t leave you feeling sluggish. If you’re into other high-protein recipes like High Protein Banana Bread Baked Oatmeal, this will fit right into your routine.
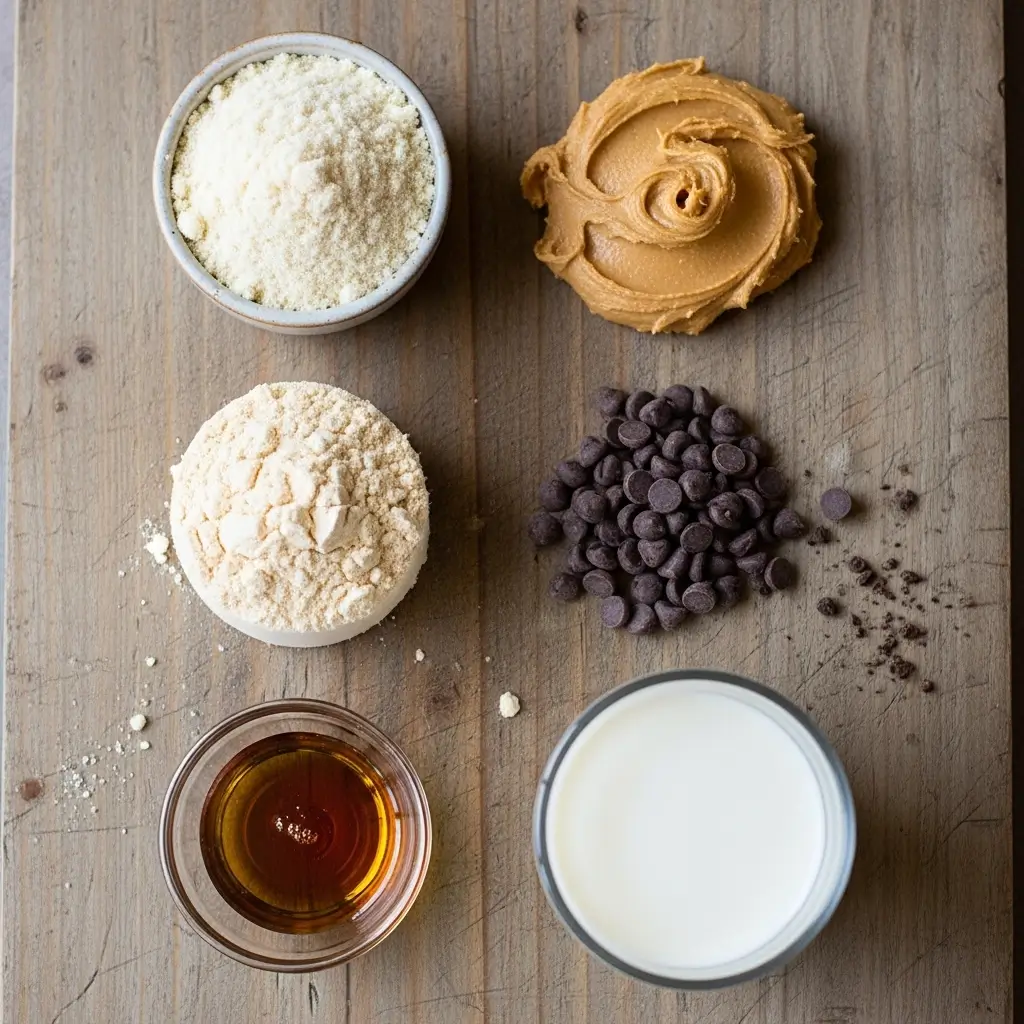
Ingredients Needed to Make Protein Cookie Dough
- 1 cup almond flour
- ½ cup vanilla protein powder (pea, whey, or your favorite plant-based blend)
- ¼ cup creamy peanut butter (unsalted)
- ¼ cup maple syrup
- ¼ cup non-dairy milk (plus more if needed)
- 1 teaspoon vanilla extract
- ⅔ cup chocolate chips
Instructions to Make Protein Cookie Dough – Step by Step
This Step by Step guide walks you through how to make creamy, chewy Protein Cookie Dough in under 10 minutes — no baking required, no mess, no guilt. Whether you’re prepping a healthy snack for the week or just need something sweet after dinner, follow along for foolproof results.
Step 1: Mix Your Dry Ingredients – The Foundation of Great Texture
Start your Step by Step process by grabbing a medium-sized mixing bowl — ideally one with enough room to stir comfortably without everything flying out (we’ve all been there). Add 1 cup of almond flour and ½ cup of vanilla protein powder to the bowl.
Whisk them together until fully combined. This not only distributes the protein powder evenly but also breaks up any lumps in the almond flour. The almond flour gives that soft, buttery texture reminiscent of real cookie dough, while the protein powder adds structure and (of course) protein.
If you’re new to protein powders, choosing the right one makes a big difference. Vanilla is the safest bet because it blends beautifully with nut butter and chocolate. You can check out our Cookie Dough Protein Powder Balls recipe for ideas on flavor combinations that work best.
Step 2: Warm and Soften the Peanut Butter – The Secret to Smooth Mixing
This Step by Step moment is all about making your dough creamy and easy to mix. Scoop ¼ cup of creamy peanut butter (unsalted if possible) into a small microwave-safe bowl. Warm it for about 15–20 seconds in the microwave — just enough to loosen it up so it pours easily.
You don’t want it hot; you want it smooth and spreadable. Think of it like warming up before a workout — it makes everything flow better. If you’re avoiding peanuts, feel free to swap in almond or cashew butter. Sunflower seed butter also works wonderfully for a nut-free option (and has a similar richness).
For more creative nut butter swaps, check out Salted Caramel Protein Balls — that recipe uses a caramel twist that’s incredible for variety.
Step 3: Combine Wet and Dry Ingredients – The Dough Comes to Life
Now, pour your warmed peanut butter into the bowl of dry ingredients. Add ¼ cup maple syrup, ¼ cup non-dairy milk, and 1 teaspoon vanilla extract. Using a rubber spatula, start stirring gently from the center outward.
This is where your dough really starts to take shape — you’ll see it transition from a crumbly mix to a thick, cookie dough consistency. If the dough looks too dry or crumbly, don’t panic. Add another tablespoon or two of milk, mixing each time until it comes together.
Here’s a pro tip: different protein powders absorb liquid differently. Plant-based powders (like pea or rice) tend to need a bit more milk than whey. Keep that in mind as you go. This is a classic Step by Step adjustment that guarantees your dough ends up perfectly soft and pliable, not dry or chalky.
If you’re looking for more guidance on consistency, our High Protein Banana Bread Baked Oatmeal post shares tips on how protein powders behave in no-bake recipes — it’s worth a read.
Step 4: Fold in the Chocolate Chips – The Fun (and Sweet) Step
Once your base dough feels just right, it’s time for the best part — chocolate chips! Add ⅔ cup of chocolate chips to the bowl. Use your spatula or clean hands to fold them in evenly.
This Step by Step action not only distributes the chips perfectly but also gives you a little arm workout. If you like a little crunch, you can also mix in chopped nuts, shredded coconut, or even bits of crushed pretzels for that sweet-salty combo.
For an even more indulgent twist, try mixing in mini white chocolate chips or dark chocolate chunks. You can find some fun mix-in inspiration in our Protein Brownie Bites recipe — they’re packed with clever ways to keep healthy snacks exciting.
Step 5: Adjust the Texture – Get That Perfect Dough Feel
This Step by Step step might sound simple, but it’s key to getting the texture right. Take a small spoonful of your dough and roll it between your fingers. If it feels sticky, sprinkle in a little more almond flour. If it’s too dry, add a teaspoon of milk.
The goal is a dough that holds its shape but still feels soft and chewy — like traditional cookie dough straight from the bowl. Don’t rush this part; a minute of adjusting here makes all the difference in the final result.
You’ll know you nailed it when the dough forms a smooth, cohesive ball without sticking to your hands.
Step 6: Taste and Fine-Tune the Flavor – The Rewarding Part
This Step by Step moment is your chance to get personal with the flavor. Go ahead and taste a small spoonful (don’t pretend you weren’t planning to anyway).
If you like things sweeter, add a drizzle of maple syrup. For a richer flavor, toss in a pinch of sea salt or an extra drop of vanilla extract. And if you’re feeling adventurous, sprinkle a few flaky sea salt crystals on top for that sweet-salty contrast that makes desserts next-level good.
This is also a great time to customize your batch for different preferences — half with dark chocolate, half with peanut butter chips, or even roll some in cocoa powder for a “truffle” version.
Step 7: Serve and Store – Ready for Snacking Anytime
Now that your dough is perfect, you can enjoy it as-is or roll it into bite-sized balls for grab-and-go snacks. If you prefer chilled dough, pop it in the fridge for about 15 minutes — it firms up beautifully while staying soft in the center.
To store, keep it in an airtight container in the refrigerator for up to 7 days. It’ll stay fresh, soft, and ready to eat anytime those cravings hit. You can also freeze it for up to 3 months; just thaw before serving.
If you want to meal-prep a few snack options at once, pair this with our Strawberry Cheesecake Protein Balls — they complement each other perfectly and keep your snacking game strong.
Step 8: Bonus Serving Ideas – Get Creative!
You can spoon Protein Cookie Dough over Greek yogurt, crumble it into overnight oats, or even add a few bites on top of your smoothie bowl. It’s fantastic alongside coffee or almond milk too.
And here’s a fun Step by Step trick: roll small scoops of the dough in crushed nuts or cocoa powder for bite-sized “energy truffles.” They’re ideal for busy mornings or pre-workout energy boosts.
For more high-protein treats that follow this easy Step by Step style, you’ll love recipes like the Greek Yogurt Banana Muffins — soft, wholesome, and just as satisfying.
What to Serve with Protein Cookie Dough
This dough is so versatile it can tag along with just about anything. Spoon it over Greek yogurt, crumble it onto protein pancakes, or pair it with a scoop of Greek Yogurt Banana Muffins for a double dose of goodness. It also pairs surprisingly well with coffee or almond milk for a light afternoon snack. For dessert nights, serve it alongside some frozen berries or a drizzle of dark chocolate sauce—it’s the kind of combo that feels indulgent but still fits your goals.
Key Tips for Making Protein Cookie Dough
- Use good-quality protein powder—your flavor depends on it. Stick with vanilla for that classic cookie dough taste.
- Adjust texture by feel—different protein powders absorb liquid differently, so tweak the milk as needed.
- Warm your nut butter just enough to make mixing easier.
- Add mix-ins—chopped nuts, crushed graham crackers, or even white chocolate chips can make it exciting.
- Chill before serving if you like a firmer texture (especially for rolling into balls).
Storage and Reheating Tips for Protein Cookie Dough
This recipe doesn’t technically need reheating, but it does store beautifully. Keep your dough in an airtight container in the refrigerator for up to 7 days. If you’d like to prep a larger batch, you can also freeze it. Just roll the dough into balls, freeze on a tray for an hour, and then store them in a freezer bag for up to three months. When ready to eat, just thaw in the fridge for 15 minutes or let them sit at room temperature.
FAQs
Can I bake this dough into cookies? Technically yes, but it’s designed to be eaten raw. Baking it won’t give the same chewy texture.
Can I make it nut-free? Yes! Swap peanut butter for sunflower seed or tahini.
What if I don’t have protein powder? Substitute with extra almond flour, but it’ll lower the protein content.
Can I make it vegan? Absolutely—use plant-based protein powder and dairy-free chocolate chips.
Final Thoughts
Protein Cookie Dough is one of those recipes that proves eating healthy doesn’t mean sacrificing flavor. It’s quick, comforting, and packed with nutrients your body actually needs. Whether you’re powering through a busy day or winding down after a workout, this treat has your back. And if you’re into recipes that strike that perfect balance between indulgent and nourishing, you might also love my Salted Caramel Protein Balls or Strawberry Cheesecake Protein Balls.
Follow us on Pinterest for weekly slow cooker inspiration, or join the conversation over on our Facebook page where fellow food lovers share their favorite comfort meal.

Protein Cookie Dough: Quick, Chewy, and Totally Crave-Worthy
- Prep Time: 10 minutes
- Cook Time: 0 minutes
- Total Time: 10 minutes
- Yield: 8
- Category: Snack
- Method: No-cook
- Cuisine: American
- Diet: Gluten Free
Description
This Protein Cookie Dough is a five-minute, no-bake treat that’s soft, chewy, and loaded with classic cookie dough flavor — all without eggs or refined sugar. With around 10g of protein per serving, it’s a perfect post-workout snack or healthy dessert.
Ingredients
- 1 cup almond flour
- ½ cup vanilla protein powder
- ¼ cup creamy peanut butter (unsalted)
- ¼ cup maple syrup
- ¼ cup non-dairy milk (plus extra if needed)
- 1 teaspoon vanilla extract
- ⅔ cup chocolate chips
Instructions
1. In a mixing bowl, whisk together almond flour and protein powder until well combined.
2. Microwave the peanut butter for about 20 seconds to soften.
3. Add the warmed peanut butter to the dry ingredients along with maple syrup, non-dairy milk, and vanilla extract.
4. Stir with a rubber spatula until a thick dough forms. If too dry, add 1–2 tablespoons of extra milk.
5. Fold in chocolate chips until evenly distributed.
6. Enjoy immediately or roll into bite-sized balls for easy snacking.
7. Store in an airtight container in the refrigerator for best texture.
Notes
Vanilla pea protein, whey, or other plant-based protein powders can all be used — stick with vanilla flavor for best results.
Swap peanut butter with almond, cashew, or sunflower seed butter for different flavor profiles.
For firmer texture, refrigerate before serving. Keeps well in the fridge for several days.
Perfect for quick snacks, post-workout fuel, or a healthier dessert.


