Strawberry Cheesecake Protein Balls are the kind of snack that makes you feel like you’re cheating—except you’re totally not. Imagine the creamy tang of cheesecake colliding with the sweet charm of strawberries, all tucked neatly into bite-sized bliss. These no-bake Strawberry Cheesecake Protein Balls are everything a busy woman dreams of: fast, wholesome, and ready whenever that “I just need something sweet but healthy” craving strikes.
They’re perfect for post-workout fuel, mid-afternoon pick-me-ups, or even late-night fridge raids. Packed with protein, gluten-free goodness, and all the flavor of a slice of cheesecake (minus the guilt trip), these Strawberry Cheesecake Protein Balls might just become your new favorite snack.
Table of Contents
What is Strawberry Cheesecake Protein Balls?
Strawberry Cheesecake Protein Balls are a high-protein, no-bake snack that captures all the indulgent flavors of your favorite dessert—without the sugar crash. Made with almond flour, protein powder, and freeze-dried strawberries, these little treats have that dreamy cheesecake creaminess, balanced by natural sweetness from maple syrup or honey.
Think of them as dessert meets energy bite—a snack that keeps you full and fueled while satisfying your sweet tooth. Each ball has about 85 calories and 4 grams of protein, making them a smarter alternative to store-bought bars or cookies. Plus, they’re super customizable: you can swap ingredients, add chocolate chips, or go vegan with dairy-free cream cheese. These Strawberry Cheesecake Protein Balls are your ticket to dessert-level happiness without derailing your health goals.
Reasons to Try Strawberry Cheesecake Protein Balls
Let’s be real—life gets busy, and when that 3 p.m. hunger pang hits, you need something quick. Strawberry Cheesecake Protein Balls are that little miracle snack that fits perfectly between your morning coffee and dinner prep. They’re gluten-free, high in protein, and made from simple ingredients you can actually pronounce.
You don’t even need to turn on the oven. The no-bake method keeps things fuss-free (and your kitchen cool). Plus, they store beautifully for meal prep—so you can make a batch Sunday and snack all week long. Whether you’re a gym-goer, mom-on-the-go, or someone trying to eat better without feeling deprived, these Strawberry Cheesecake Protein Balls check every box: sweet, creamy, easy, and nourishing.
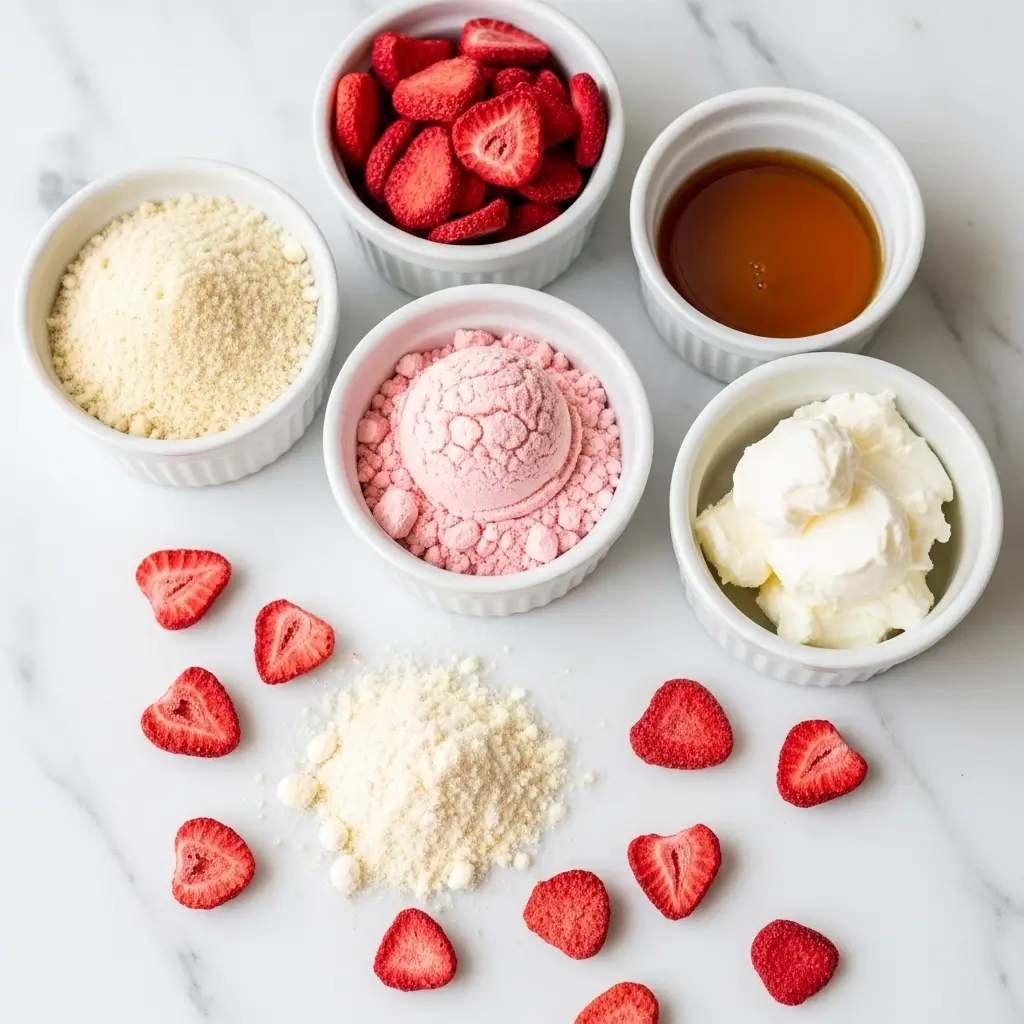
Ingredients Needed to Make Strawberry Cheesecake Protein Balls
- 1/2 cup freeze-dried strawberries
- 1 cup almond flour
- 1/4 cup vanilla or unflavored protein powder
- 2 tablespoons coconut flour
- 1/4 teaspoon salt
- 3 tablespoons maple syrup or honey
- 1/4 cup cream cheese (regular or dairy-free)
- 1 teaspoon pure vanilla extract
- 1–2 tablespoons milk of choice (as needed)
Instructions to Make Strawberry Cheesecake Protein Balls – Step by Step
Creating these Strawberry Cheesecake Protein Balls Step by Step is truly one of those satisfying kitchen moments where everything comes together quickly and beautifully. This recipe is all about balance — creamy meets fruity, indulgent meets nourishing, and flavor meets simplicity. Follow this detailed Step by Step guide, and by the time you’re done, you’ll have a tray of bite-sized bliss ready to chill and enjoy.
Step 1: Prepare Your Strawberry Powder
Start this Step by Step journey with the ingredient that makes this recipe so special — freeze-dried strawberries. They’re not only convenient, but they also pack an intense strawberry flavor without adding moisture. Place ½ cup of freeze-dried strawberries into a high-speed blender or food processor. Pulse until they transform into a fine, rosy powder. This powder is your flavor base and natural coloring, so take a moment to inhale that sweet, nostalgic scent. If you’re curious about ingredient swaps (like using raspberries or blueberries for a twist), you might enjoy our Sweet Potato and Chickpea Curry — it explores fun ways to blend natural sweetness into healthy recipes.
Step 2: Combine the Dry Ingredients
Next in this Step by Step process, grab a large mixing bowl and combine your dry ingredients: 1 cup of almond flour, your freshly made strawberry powder, ¼ cup of protein powder (vanilla or unflavored works best), 2 tablespoons of coconut flour, and a pinch (¼ teaspoon) of salt. Stir everything together until evenly mixed. Each ingredient has a purpose — the almond flour adds healthy fats and a nutty texture, the coconut flour gives structure, and the protein powder helps these little gems double as a post-workout snack. The salt might seem minor, but don’t skip it — it heightens the sweetness and rounds out the cheesecake flavor.
If you’re wondering what kind of protein powder blends best, take a peek at our guide on choosing the right protein base featured in recipes like Crockpot Cheesy Chicken Broccoli Soup, where protein-packed ingredients make all the difference in flavor and nutrition.
Step 3: Mix in the Wet Ingredients
Here’s where the magic really happens in this Step by Step guide — time to turn those dry ingredients into a rich, creamy dough. Add 3 tablespoons of maple syrup (or honey, if you prefer), ¼ cup of softened cream cheese, and 1 teaspoon of vanilla extract into your bowl. Mix with a sturdy spatula or your hands (honestly, hands make it easier). You’ll see the dough begin to form and take on that creamy, pinkish hue reminiscent of strawberry cheesecake filling.
If you’re going for a vegan version, use dairy-free cream cheese and maple syrup instead of honey. You can check out how ingredient swaps work beautifully in our Marry Me Chicken Tortellini Soup, where dairy-free options blend seamlessly without sacrificing flavor.
Step 4: Adjust the Dough Consistency
At this point in the Step by Step method, you’ll likely notice your dough’s texture. If it’s too crumbly or dry, add milk of your choice one tablespoon at a time until it becomes soft and pliable — think cookie dough consistency. The key is balance; it should hold its shape without sticking to your hands. Too much liquid can make the dough mushy, while too little will make it fall apart when rolling.
If you’re using a plant-based protein powder, you might need an extra splash of milk since those tend to absorb more moisture. This is a great time to customize — maybe add a sprinkle of chia seeds for crunch or a handful of mini chocolate chips for a decadent twist. If flavor layering fascinates you, visit our Garlic Parmesan Chicken and Potatoes recipe for more inspiration on balancing textures and tastes.
Step 5: Roll into Perfect Bites
Now comes the fun, hands-on part of this Step by Step process. Use a small cookie scoop or simply roll the dough between your palms to form smooth, bite-sized balls. Aim for about 1 inch in diameter — just enough for two perfect bites. Line them up on a parchment-lined tray or plate for easy cleanup. You should end up with around 12 Strawberry Cheesecake Protein Balls, depending on how generous your scoops are (no judgment if you “taste test” along the way).
Pro tip: Lightly dampen your hands with water before rolling to keep the dough from sticking. You’ll get smooth, picture-perfect rounds every time.
Step 6: Chill and Set the Texture
This is a key step in the Step by Step process that gives your protein balls that classic cheesecake-like texture. Place the tray in the fridge for at least 30 minutes. Chilling helps the fats in the almond flour and cream cheese firm up, making each bite creamy yet firm. Once set, they’ll hold their shape perfectly even at room temperature for short periods — perfect for lunchboxes or post-gym snacks.
If you’re a fan of prepping ahead, you might also enjoy the convenience of freezer-friendly meals like our Slow Cooker Ramen Noodles. Both recipes highlight how make-ahead dishes can save time without compromising quality.
Step 7: Serve, Store, and Enjoy
Once chilled, your Strawberry Cheesecake Protein Balls are ready to shine! Store them in an airtight container in the refrigerator for up to 7 days or freeze for up to 2 months. To enjoy from frozen, let them thaw in the fridge overnight or at room temperature for about 10 minutes. No reheating needed — just pop one and savor that creamy strawberry cheesecake flavor.
Want to make them extra fancy? Roll them in crushed freeze-dried strawberries or a light dusting of coconut flour for a bakery-style finish.
If you love simple, no-fuss recipes like this, you’ll adore our Easy One-Pot Green Enchiladas Soup — another crowd-pleaser that delivers maximum flavor with minimal effort.
What to Serve with Strawberry Cheesecake Protein Balls
These Strawberry Cheesecake Protein Balls are delicious on their own, but they also pair beautifully with your morning coffee or a cup of green tea. For a mini “dessert board,” try serving them alongside some fresh strawberries and a few squares of dark chocolate. If you’re meal-prepping, pack them with a few nuts and a boiled egg for a balanced snack. They even make a great grab-and-go breakfast for those chaotic mornings when you’re running late.
Key Tips for Making Strawberry Cheesecake Protein Balls
- Use freeze-dried strawberries, not fresh—they give you that concentrated strawberry flavor without making the dough wet.
- Choose a high-quality protein powder you love the taste of since it’ll make or break the flavor.
- Don’t skip chilling! It helps the balls firm up and hold their shape.
- Want a vegan version? Use dairy-free cream cheese and maple syrup instead of honey.
- Store them properly—in an airtight container in the fridge—to keep that creamy, fresh taste.
Storage and Reheating Tips for Strawberry Cheesecake Protein Balls
These beauties don’t require reheating, but storage matters. Keep your Strawberry Cheesecake Protein Balls in the fridge in an airtight container for up to 7 days. If you’d like to make a big batch, they freeze beautifully—just place them in a freezer-safe bag or container for up to 2 months. When you’re ready to eat, let them thaw in the fridge overnight or at room temperature for about 10 minutes. Avoid microwaving, as it can change their texture.
FAQs
Can I use fresh strawberries instead of freeze-dried? Not recommended; fresh strawberries add moisture that can make the dough soggy.
What protein powder works best? Vanilla or unflavored whey, plant-based, or collagen protein all work well.
Can I make these nut-free? Yes! Swap almond flour for oat flour.
Do they taste like real cheesecake? Absolutely—they’ve got that creamy, tangy, sweet combo down perfectly.
Final Thoughts
Strawberry Cheesecake Protein Balls are proof that healthy snacking doesn’t have to be boring. In just 10 minutes, you can whip up a batch of creamy, fruity, and totally satisfying treats that make your taste buds happy and your body grateful. Whether you’re sneaking one between meetings or handing them out to your kids after school, these little bites of joy are here to make your days smoother and sweeter.
For another protein-packed, meal-prep-friendly option, check out our Crockpot Cheesy Chicken Broccoli Soup or the cozy One-Pot Green Enchiladas Soup. And if you want more creamy comfort food, our Garlic Parmesan Chicken and Potatoes is a must-try.
For more on protein-packed snacks and balanced eating, visit the Harvard School of Public Health’s protein guide.
Follow us on Pinterest for weekly slow cooker inspiration, or join the conversation over on our Facebook page where fellow food lovers share their favorite comfort meal.
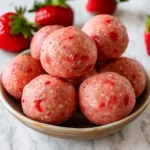
Strawberry Cheesecake Protein Balls: Quick, Creamy, and Delicious
- Prep Time: 10 minutes
- Cook Time: 0 minutes
- Total Time: 10 minutes
- Yield: 12 protein balls
- Category: Snack
- Method: No-Bake
- Cuisine: American
- Diet: Gluten Free
Description
A no-bake, high-protein snack that captures the creamy, fruity essence of strawberry cheesecake in a healthy, bite-sized treat. These protein balls are quick to make, gluten-free, and perfect for meal prep or post-workout snacking.
Ingredients
- 1/2 cup freeze-dried strawberries
- 1 cup almond flour
- 1/4 cup vanilla or unflavored protein powder
- 2 tablespoons coconut flour
- 1/4 teaspoon salt
- 3 tablespoons maple syrup or honey
- 1/4 cup cream cheese (regular or dairy-free)
- 1 teaspoon pure vanilla extract
- 1–2 tablespoons milk of choice (as needed)
Instructions
1. Blend the freeze-dried strawberries into a fine powder using a blender or food processor.
2. In a mixing bowl, combine the almond flour, strawberry powder, protein powder, coconut flour, and salt.
3. Add the maple syrup, cream cheese, and vanilla extract to the dry ingredients and mix until a thick dough forms.
4. If the dough is too dry, add 1 tablespoon of milk at a time until it comes together.
5. Roll the dough into small bite-sized balls and place them on a parchment-lined tray.
6. Refrigerate the balls for at least 30 minutes to firm them up before serving.
Notes
Add mini chocolate chips or use chocolate protein powder for a chocolate twist.
Swap almond flour with oat flour for a nut-free version.
Boost protein by adding chia or hemp seeds.
For a tarter flavor, add chopped dried cranberries or extra strawberry powder.
Use dairy-free cream cheese and maple syrup for a vegan option.
Store in an airtight container in the fridge for up to 1 week or freeze for up to 2 months.