Creamy Homemade Baked Mac and Cheese is the comfort food we all crave — especially when life feels like one long to-do list. There’s something deeply satisfying about pulling a bubbling, golden pan of mac and cheese out of the oven and knowing it’s about to make everyone at the table smile. The combination of velvety cheese sauce, tender pasta, and that irresistible baked crust hits all the right notes.
Whether you’re making it for a cozy family dinner, potluck, or just a “because I deserve it” kind of night, this dish delivers that warm, creamy perfection every time. The best part? You don’t have to be a chef to nail it. This Creamy Homemade Baked Mac and Cheese is easy, comforting, and always a hit — the kind of recipe that becomes a family favorite faster than you can say “pass the cheese.”
Table of Contents
What is Creamy Homemade Baked Mac and Cheese?
Creamy Homemade Baked Mac and Cheese is the soul of American comfort food. Unlike the boxed version (we’ve all had those college-night dinners), this homemade version layers real cheese flavor and a smooth, luscious sauce baked to golden perfection. It’s made with simple pantry staples like butter, milk, flour, and a mix of cheddar and Gruyère cheese for that rich, tangy bite.
The process starts with a roux — a buttery base that thickens the sauce — then blends into a creamy cheese mixture that hugs every macaroni piece like a warm blanket. Once baked, the top gets slightly crisp while the inside stays melt-in-your-mouth creamy. Think of it as the grown-up version of your childhood favorite, perfect for Sunday dinners, Thanksgiving tables, or any day that needs a little extra comfort.
Reasons to Try Creamy Homemade Baked Mac and Cheese
There are plenty of reasons why this Creamy Homemade Baked Mac and Cheese deserves a spot in your recipe rotation. First, it’s a guaranteed crowd-pleaser — even the pickiest eaters can’t say no to cheesy pasta. Second, it’s incredibly versatile. You can add extras like crispy bacon, caramelized onions, or roasted veggies to give it your own twist.
Third, it’s make-ahead friendly, which means you can prep it the night before and bake it when you’re ready. And finally, it’s pure comfort in a casserole dish. On chilly days or stressful evenings, it brings that nostalgic, cozy feeling right to your table. If you love creamy casseroles, you might also enjoy my Honey Pepper Chicken Mac and Cheese for another cheesy dinner win.
Ingredients Needed to Make Creamy Homemade Baked Mac and Cheese
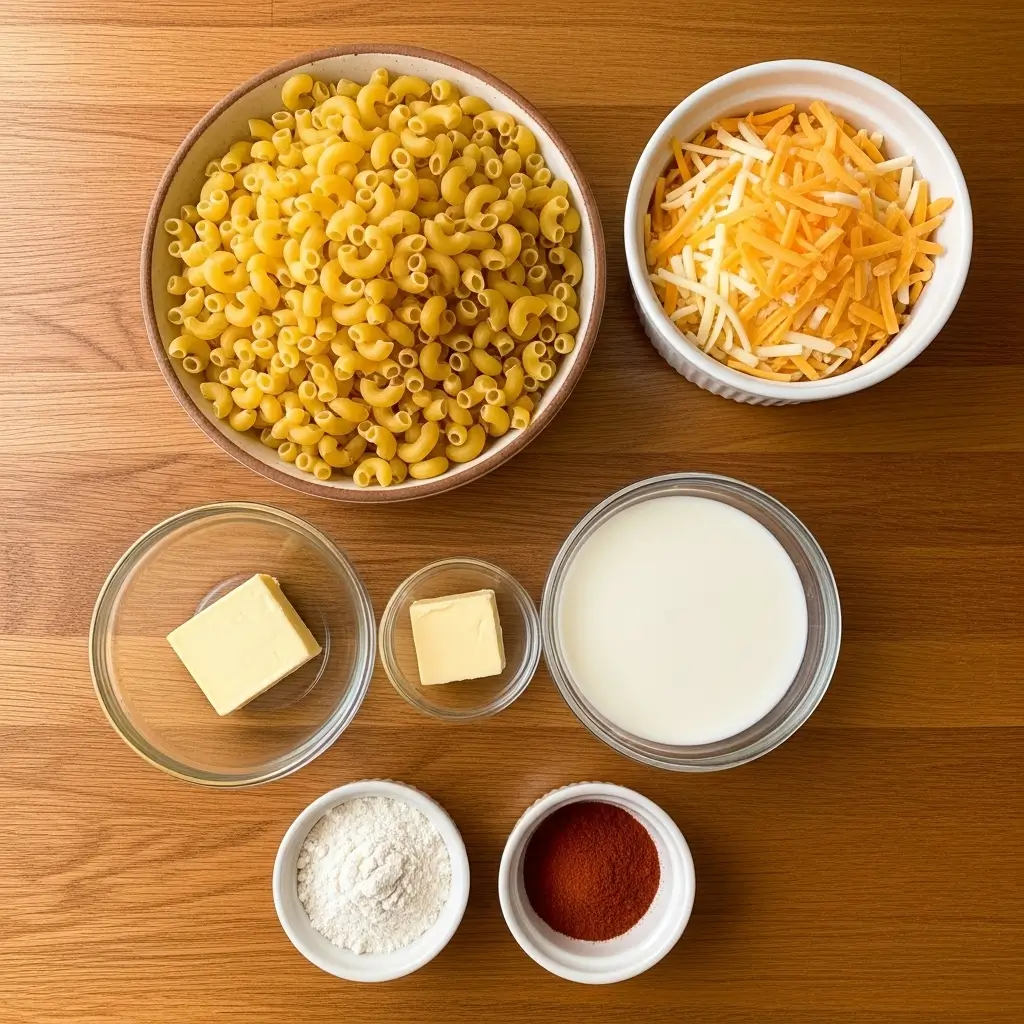
- 1 lb. dried elbow pasta
- 1/2 cup unsalted butter
- 1/2 cup all-purpose flour
- 1 1/2 cups whole milk
- 2 1/2 cups half and half
- 4 cups shredded medium cheddar cheese, divided
- 2 cups shredded Gruyère cheese, divided
- 1/2 Tbsp. salt
- 1/2 tsp. black pepper
- 1/4 tsp. paprika
Instructions to Make Creamy Homemade Baked Mac and Cheese
This Creamy Homemade Baked Mac and Cheese Step-by-Step guide will walk you through every detail to help you achieve that perfectly creamy, golden, and irresistible result — even if it’s your first time making it from scratch. Each step builds flavor and texture, so by the end, you’ll have a dish that’s melt-in-your-mouth delicious and worthy of every “wow” at the table.
Step 1: Preheat and Prepare Your Dish
The first step-by-step move is setting the stage for success. Preheat your oven to 325°F and lightly grease a 3-quart baking dish with butter or nonstick spray. This keeps the mac and cheese from sticking and helps it bake evenly. If you love classic comfort casseroles, you might also enjoy my Creamy Chicken Broccoli Casserole — it bakes beautifully just like this dish.
Step 2: Cook the Pasta Perfectly
In this step-by-step stage, bring a large pot of salted water to a boil and cook the elbow pasta until it’s just al dente — tender with a slight bite. This is important because the pasta will continue to cook once baked, and you don’t want mushy noodles. After draining, drizzle a little olive oil or butter on top and toss to keep them from sticking together while you prepare the sauce. If you’re curious about alternative pastas, check out my Gluten-Free Chicken Casserole for ideas on gluten-free swaps that work beautifully in baked dishes.
Step 3: Create the Creamy Roux Base
This step-by-step moment is where the magic begins. In a large saucepan, melt ½ cup of butter over medium heat. Once melted, whisk in ½ cup of all-purpose flour until the mixture looks smooth and slightly golden — this is your roux. It’s what thickens the cheese sauce and keeps it creamy instead of grainy. Keep whisking for about a minute to cook off the raw flour taste.
Now, gradually pour in 1½ cups of milk and 2½ cups of half-and-half, whisking constantly until the mixture becomes thick and velvety. Think of it as a creamy canvas waiting for the cheese masterpiece you’re about to add.
Step 4: Melt in the Cheese for That Creamy Dreaminess
In this step-by-step process, reduce the heat to low and add in 3 cups of shredded cheddar and 1½ cups of shredded Gruyère cheese, saving the rest for layering later. Stir slowly as the cheese melts into a smooth, rich sauce. This is the moment you’ll start to smell that heavenly, cheesy aroma that fills your kitchen with comfort. Add ½ tablespoon of salt, ½ teaspoon of black pepper, and ¼ teaspoon of paprika for that subtle smoky warmth. For a flavor twist, try adding a dash of ground mustard or a splash of hot sauce — both pair beautifully with creamy cheese bases, much like in my Honey Pepper Chicken Mac and Cheese.
Step 5: Combine the Pasta and Cheese Sauce
Here’s where everything comes together, step by step. Pour your cooked pasta into the cheese sauce and gently fold until every elbow is coated in that luscious, creamy mixture. Take your time — this isn’t just stirring; it’s an act of love. When each noodle glistens with cheese, you’ll know you’ve nailed it.
Step 6: Layer for a Golden, Cheesy Finish
Pour half of your pasta mixture into the prepared baking dish, then sprinkle a generous layer of the remaining cheddar and Gruyère over the top. Add the rest of the pasta and finish with another cheesy layer. This step-by-step layering creates that golden, bubbly crust everyone fights over at dinner. If you like a little crunch, mix breadcrumbs with melted butter and scatter them on top before baking for a crisp texture similar to the topping in my Paula Deen Corn Casserole.
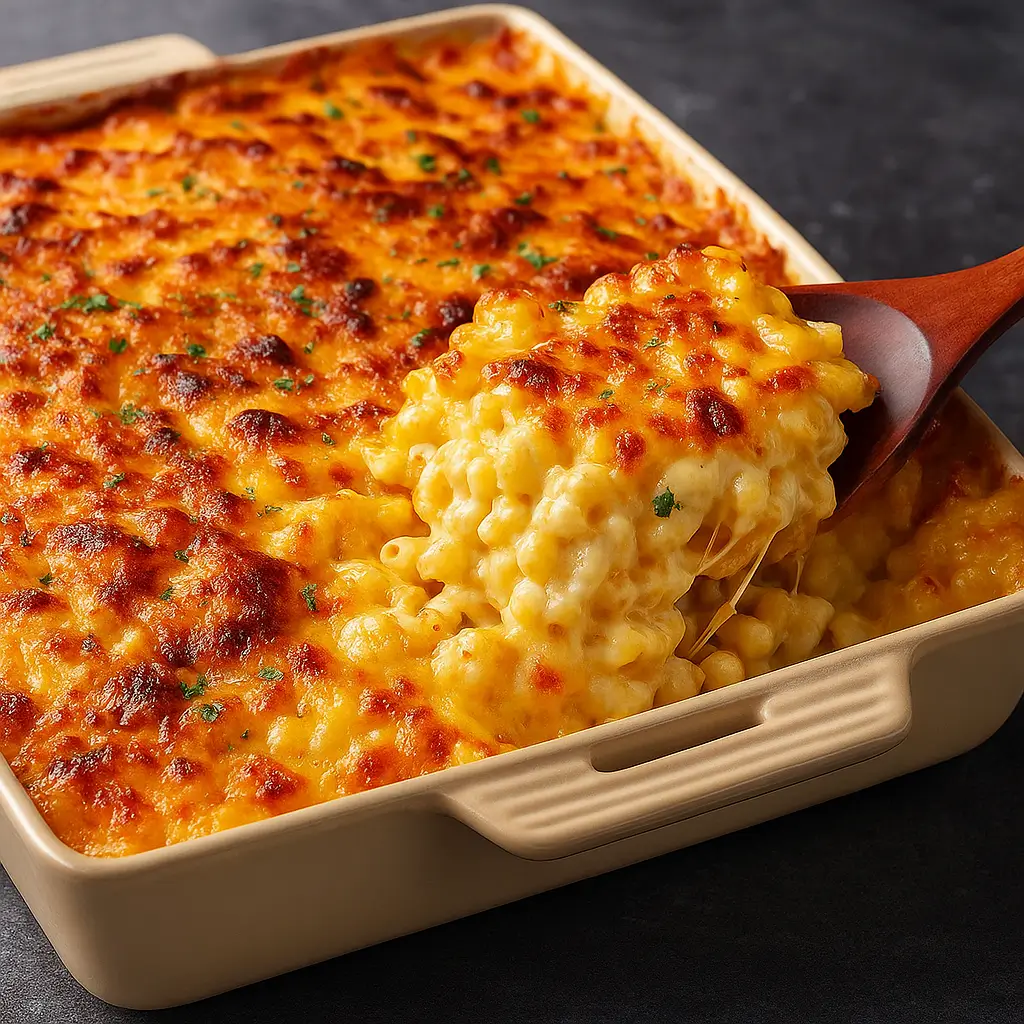
Step 7: Bake Until Bubbly and Golden
Place your dish in the oven and bake for 15 minutes, or until the cheese is bubbling around the edges and the top is lightly golden. This step-by-step transformation is what takes your mac and cheese from creamy stovetop comfort to that iconic baked perfection. Once done, let it rest for 5 minutes before serving — it helps the sauce settle and makes scooping easier (plus, it’s less likely to burn eager tongues!).
Step 8: Serve and Enjoy Every Creamy Bite
Now comes the most rewarding step-by-step part — serving it! Use a large spoon to scoop generous portions of that cheesy goodness. Pair it with roasted veggies, a crisp salad, or even some baked chicken for a hearty meal. This Creamy Homemade Baked Mac and Cheese also makes a wonderful side dish for holiday feasts alongside Classic Green Bean Casserole or Sweet Potato Casserole with Pecan Topping.
What to Serve with Creamy Homemade Baked Mac and Cheese
This Creamy Homemade Baked Mac and Cheese pairs beautifully with just about anything. For a hearty dinner, try serving it alongside roasted chicken, baked salmon, or a crisp green salad. If you’re planning a holiday feast, it’s the perfect side for turkey or ham. You can also keep things simple with some steamed broccoli or garlic bread to round out the meal. Looking for more casserole comfort? Check out my Paula Deen Corn Casserole for a Southern-inspired side that pairs perfectly.
Key Tips for Making Creamy Homemade Baked Mac and Cheese
To get that ultra-creamy texture, don’t skip the roux — it’s what keeps your sauce silky instead of grainy. Grate your cheese fresh rather than using pre-shredded (those have anti-caking agents that affect melting). Taste the sauce before baking to adjust seasoning — sometimes a little extra salt makes a big difference. Want a flavor boost? Add a dash of garlic powder or a hint of smoked paprika. And if you love a crunchy topping, sprinkle breadcrumbs mixed with melted butter on top before baking for an extra layer of texture.
Storage and Reheating Tips for Creamy Homemade Baked Mac and Cheese
Leftovers? Lucky you! Store your Creamy Homemade Baked Mac and Cheese in an airtight container in the fridge for up to 4 days. When reheating, add a splash of milk to revive that creamy texture. Reheat gently on the stove or cover with foil and warm it in the oven at 325°F until heated through. It also freezes beautifully — just cool it completely, wrap tightly, and freeze for up to 2 months. To serve again, thaw overnight in the fridge and reheat with a touch of milk.
FAQs
Can I make this ahead of time? Absolutely! Assemble it, refrigerate overnight, then bake when ready.
Can I use different cheeses? Yes, try mozzarella, Monterey Jack, or even pepper jack for a fun twist.
How do I make it gluten-free? Swap the flour for a gluten-free all-purpose blend and use gluten-free pasta.
What’s the best pasta shape? Elbows are classic, but shells or cavatappi also hold the sauce beautifully.
Final Thoughts
There’s nothing quite like a bubbling pan of Creamy Homemade Baked Mac and Cheese to bring everyone together. It’s simple, satisfying, and full of that comforting, cheesy goodness we all need sometimes. Whether you’re serving it as a side or the main event, it’s a dish that never fails to please. For more cozy, family-style comfort food, don’t miss my Creamy Chicken Broccoli Casserole — it’s another creamy classic worth adding to your recipe box.
Follow us on Pinterest for weekly slow cooker inspiration, or join the conversation over on our Facebook page where fellow food lovers share their favorite comfort meal.
Print
Creamy Homemade Baked Mac and Cheese Recipe – Easy and Delicious
- Prep Time: 20 minutes
- Cook Time: 15 minutes
- Total Time: 35 minutes
- Yield: 8 servings
- Category: Main Dish
- Method: Baking
- Cuisine: American
- Diet: Vegetarian
Description
Indulge in the ultimate comfort food with this creamy homemade baked mac and cheese recipe. Cheesy, gooey, and utterly delicious, this dish is a crowd-pleaser for all ages.
Ingredients
Pasta:
- 1 lb. dried elbow pasta
Cheese Sauce:
- 1/2 cup unsalted butter
- 1/2 cup all-purpose flour
- 1 1/2 cups whole milk
- 2 1/2 cups half and half
- 4 cups shredded medium cheddar cheese, divided
- 2 cups shredded Gruyere cheese, divided
- 1/2 Tbsp. salt
- 1/2 tsp. black pepper
- 1/4 tsp. paprika
Instructions
1. Preheat oven to 325°F and grease a 3-quart baking dish.
2. Boil pasta until al dente; drain and set aside.
3. Melt butter in a saucepan, then whisk in flour to form a roux. Gradually whisk in half and half and milk until thickened.
4. Add in 3 cups of cheddar and 1 cup of Gruyere cheese. Stir until melted and smooth.
5. Combine cooked pasta with cheese sauce, mixing well.
6. Pour half the mixture into the prepared baking dish, sprinkle with 1/2 cup cheddar and 1/2 cup Gruyere.
7. Add remaining pasta mixture and top with remaining cheeses.
8. Bake for 15 minutes until bubbly and golden.
Notes
You can customize the seasonings to your preference, such as garlic powder, onion powder, ground mustard, smoked paprika, or hot sauce.
Mac and Cheese can be made ahead of time and refrigerated before baking.
For a five-cheese variation or a crunchier topping, consider adding Parmesan, mozzarella, or a panko breadcrumb crust.